Scott Hanselman

The 2020 Guide to Creating Quality Technical Screencasts, Presentations, and Remote Meetings

April 15, 2020 Comment on this post [12] Posted in Musings
Sponsored By

Being effective when presenting remotelyI've had a lot of people ask me to write up a guide to creating great technical screencasts. This is an update to my 2011 post on the same topic.

What are you doing? STOP and reassert your assumptions

Hang on. You're doing a screencast or sharing your screen in some way for a meeting, presentation, or YouTube. What does that mean and why did I suggest you stop.

This isn't a stage presentation or even a talk in a conference room. Screencasts and remote meetings have an intimacy to them. You're in someone's ear, in their headphones, you're 18 inches from their face. Consider how you want to be seen, how you want to be heard, and what is on your screen.

Try to apply a level of intentionality and deliberate practice. I'm not saying to micromanage, but I am saying don't just "share your screen." Put your empathy hat on and consider your audience and how it'll look and feel for them.

Initial setup and tools

You can use any number of tools for screen capture. They are largely the same. My preferred tool is Camtasia. Other valid tools are CamStudio (a free and open source tool) and Expression Encoder Screen Capture. You can also use OBS to record your screen and webcam.

When you're using Skype/Zoom/Teams to record live, you're already set as those tools will share for you as well as record.

Windows Look and Feel

At the risk of sounding uptight, how you setup Windows and your environment is the difference between a professional and an amateurish screencast. It's shocking how many folks will start recording a screencast without changing a thing, then wonder why their 1600x1200 screencast looks bad on YouTube at 360p or low bandwidth on a phone. If you find yourself doing screencasts a lot, considering making a custom user (maybe named Screencast?) on your machine with these settings already applied. That way you can login as Screencast and your settings will stick.

Resolution and Aspect

First, decide on your aspect ratio. Your laptop may have a ratio of width to height that is 3:2 or 4:3 but MOST people have a 16:9 Widescreen system? A VERY safe resolution in 2020 is 1280x720 (also known as 720p). That means that you'll be visible on everything from a low-end Android, any tablet, up to a desktop.

That said, statistics show that many folks now have 1920x1080 (1080p) capable systems. But again, consider your audience. If I was presenting to a rural school district, I'd use 720 or a lower resolution. It will be smoother and use less bandwidth and you'll never have issue with things being too small. If I was presenting in a professional environment I'd use 1080p. I don't present at 4k, especially if the audience is overseas from where I am. You're pushing millions of pixels that aren't needed, slowing your message and adding no additional value.

On Windows, consider your scale factor. At 1080p, 125% DPI is reasonable. At 720p (or 1366x768, using 100% scaling is reasonable).

Background Wallpaper and Icons

Choose a standard looking background photo. I prefer to use one from http://unsplash.com or the defaults that come with Windows 10 or your Mac. Avoid complex backgrounds as they don't compress well during encoding. Avoid using pictures of your kids or family unless it feeds your spirit and you don't mind mixing the professional and personal. Again - be intentional. I am neither for nor against - just be conscious and decide. Don't just accept the defaults.

Hide your desktop icons. Right click your desktop and hit View | Show Desktop Items. Also consider whether we need to see your desktop at all. If it doesn’t add value, don’t show it on the screencast.

Fonts

Try to use standard fonts and themes. While your preferred font and colors/themes offer personality, they can be distracting. Consider the message you want to present.

If you're using Visual Studio or Visual Studio Code, remember that your audience likely hasn't changed their defaults, and if you show them something fancy, they'll be thinking about how they get that fancy widget rather than your content. In Visual Studio proper, go to Tools | Options | Environment | Fonts and Colors and click "Use Defaults."

In all your text editors, consider change your fonts to Consolas Size 15. It may seem counter-intuitive to have such large fonts but in fact this will make your code viewable even on an iPhone or Tablet. 

Remember, most video sites, including YouTube, restrict the embedded video player size to a maximum of around 560p height, unless you go full-screen or use a pop-out. Use the font size recommended here, and use Camtasia’s zoom and highlight features during editing to call out key bits of code.

Don’t highlight code in the editor by selecting it with the mouse UNLESS you've deliberately change the selection background color. Defaults are typically hard to read editor selections in video. Instead, zoom and highlight in post production, or use ZoomIt and practice zooming and emphasizing on screen elements.

Browser Setup

Unless your screencast is about using different browsers, pick a browser and stick to it. Hide your toolbars, clear your cache, history, and your autocomplete history. You'd be surprised how many inappropriate sites and autocomplete suggestions are published on the web forever and not noticed until it's too late. Don't view pr0n on your screencast machine. Be aware.

Toolbars

Your browser shouldn't show any, and this is a good time to uninstall or hide whatever coupon-offering nonsense or McAffee pixel waster that you've stopped being able to see after all these years. Remember, default is the word of the day. Disable any Browser Extensions that aren't adding value.

If you are using Visual Studio or an IDE (Eclipse, Photoshop, etc) be aware of your toolbars. If you have made extensive customizations to your toolbars and you use them in the screencast, you are doing a great disservice to your audience. Put things to the default. If you use hotkeys, tell the audience, and use them for a reason.

Toast

You've got mail! Yay. Yes, but not during your screencast. Turn off Outlook Gmail, GChat, Twitter, Messenger, Skype, and anything else that can "pop toast" during your screencast.

Clock and Notifications

Go to Start on Windows 10, and search for System Icons and turn off the Clock temporarily. Why? You can't easily edit a screencast if there's a convenient time code in the corner that jumps around during your edits. Also, no one needs to know you're doing your work at 3am.

Clean out your taskbar and notification area. Anything that visually distracts, or just hide the taskbar.

Audio and Voice

Use a decent microphone. I use a Samson C01U. You can also use a USB headset-style microphone but be aware that breathing and "cotton mouth" really shows up on these. Test it! Listen to yourself! Try moving the microphone above your nose so you aren't exhaling onto it directly. Use a pop filter to help eliminate 'plosives (p's and t's). You can get them cheap at a music store.

Be aware of your keyboard clicks. Some folks feel strongly about whether or not your keyboard can be heard during a screencast. Ultimately it's your choice, but you have to be aware of it first, then make a conscious decision. Don't just let whatever happens happen. Think about your keyboard sound, your typing style and your microphone, and listen to it a few times and see if you like how it comes together.

Avoid prolonged silence. There should be ebb and flow of "I'm saying this, I'm doing that" but not 10 seconds of "watch my mouse." Speak in an upbeat but authentic tone. Be real.

Also be calm and quiet. Remember you are a foot from them and you're their ear. It's a conversation with a friend, not a presentation to thousands (even if it is).

Don’t apologize or make excuses for mistakes – either work them in as something to learn from, or remove them completely.

If you are editing the presentation - If you make a mistake when speaking or demonstrating, clap your hands or cough loudly into the mic and wait a second before starting that portion over. When editing, the mistakes will show up as loud audio spikes, making it easy to find them.

Camtasia has decent automatic noise reduction. Use it. You’ll be surprised how much background noise your room has that you, but not your audience, will easily tune out.

If you must overdub a portion of the audio, sit in the same position you did while recording the original, and have the mic in the same spot. You want your voice to blend in seamlessly.

Preferred Video Output for Prerecords

Your screen capture tool should be produced at the highest reasonable quality as it will be compressed later when it's uploaded. Think of it like producing JPEGs. You can make a 5 megabyte JPG, but often a 500k one will do. You can make a 10 gig screen capture if you use uncompressed AVI encoding, but often a high bit rate MP4 will do.

The trick is to remember that your compressed screencast will be recompressed (copies of copies) when it is run through the encoding process.

Edit your screencast, if you do, in its recorded native resolution which hopefully is what you'll publish to as well. That means, record at 1080p, edit at 1080p, and publish at 1080p. Let YouTube or your final destination do the squishing to smaller resolutions.

Personally, I like to know what's going on in my production process so I always select things like "Custom production settings" in Camtasia rather than presets. Ultimately you'll need to try and find what works for you. Use an H.264 encoder with a high bitrate for the video and 44.1kHz/441000Hz 16 bit mono for the audio. Basically make a decently sized MP4 and it should work everywhere.

Do you have enough bandwidth?

In my opinion, if you are doing a live call with Video and Screensharing and you want it to be high definition, you'll need 4 Mbps upstream from your connection. You can check this at http://speedtest.net. If you have 5-6 Mbps you've got a little more headroom. However, if someone in the house decides to get on Netflix, you could have an issue. Know your bandwidth limitations ahead of time. If it's an important stream, can you dedicate your bandwidth to just your one machine? Check out QoS (quality of service) on your router, or better yet, take your kids' iPads away! ;)

Conclusion

Take some time. I put about an hour of work into a 15 min screencast. Your mileage may vary. Watch your video! Listen to it, and have your friends listen to it. Does it look smooth? Sound smooth? Is it viewable on a small device AND a big screen? Does it FEEL good?


Sponsor: Have you tried developing in Rider yet? This fast and feature-rich cross-platform IDE improves your code for .NET, ASP.NET, .NET Core, Xamarin, and Unity applications on Windows, Mac, and Linux.

About Scott

Scott Hanselman is a former professor, former Chief Architect in finance, now speaker, consultant, father, diabetic, and Microsoft employee. He is a failed stand-up comic, a cornrower, and a book author.

facebook bluesky subscribe
About   Newsletter
Hosting By
Hosted on Linux using .NET in an Azure App Service

A series of new YouTube Videos - Please Subscribe

April 01, 2020 Comment on this post [4] Posted in Musings | Win10
Sponsored By

Hey friends, in this time of remoteness, I've been making a lot more YouTube videos and they're pretty decent, IMHO. I'd love it if you'd subscribe, share them, and encourage your friends and colleagues to subscribe as well. Head over to https://youtube.com/shanselman and click Subscribe and then the BELL.

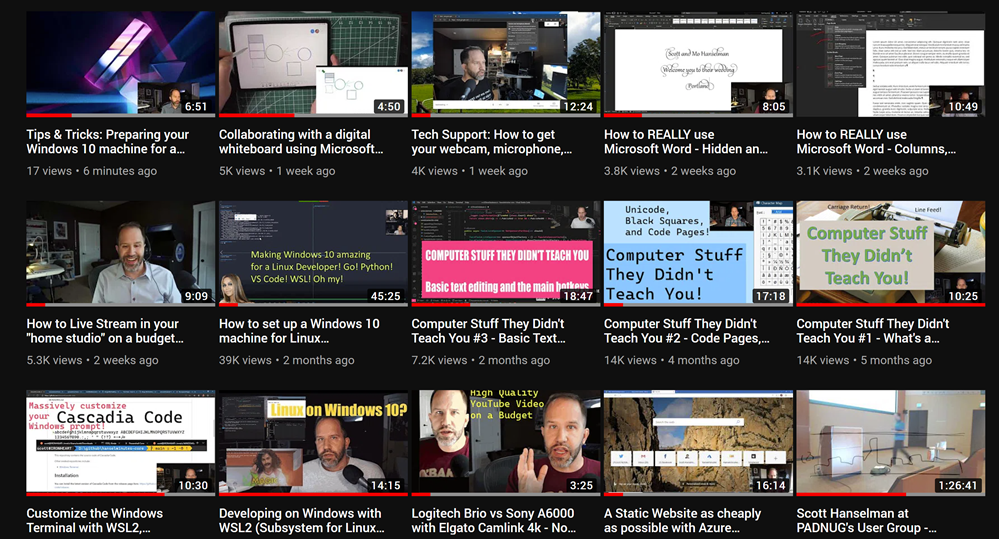
Here's just a taste of the kinds of videos I'm making. My main focus is How-To videos.

Scott's YouTube has a lot of interesting content

I'm enjoying doing videos on topics like:

If you have ideas for videos I can make that could help you out, please let me know in the comments! And subscribe!


Sponsor: This week's sponsor is...me! This blog and my podcast has been a labor of love for over 18 years. Your sponsorship pays my hosting bills for both AND allows me to buy gadgets to review AND the occasional taco. Join me!

About Scott

Scott Hanselman is a former professor, former Chief Architect in finance, now speaker, consultant, father, diabetic, and Microsoft employee. He is a failed stand-up comic, a cornrower, and a book author.

facebook bluesky subscribe
About   Newsletter
Hosting By
Hosted on Linux using .NET in an Azure App Service

How to remote desktop fullscreen RDP with just SOME of your multiple monitors

March 27, 2020 Comment on this post [33] Posted in Win10
Sponsored By

I saw this over on the Microsoft Remote Desktop Uservoice

Allow ability to choose subset of local monitors for RDP session (full screen)

Allow ability to select a subset of current monitors with full screen. Currently can choose all or 1 but cannot choose for instance 2 of 3 (full screen).

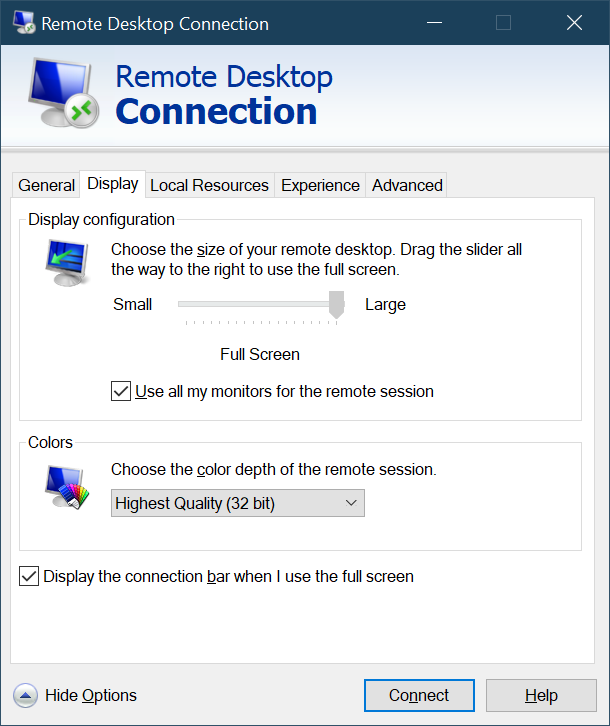
That seems useful, I wish it did that. I know about this checkbox that says "Use all my monitors" but I can't say just use 1 and 2 but not 3, right?

Remote Desktop

Turns out that you CAN span n monitors but it's just buried/internal and has no UI.

Save your RDP file, and open it in Notepad. Everyone's RDP file is different but yours may look like this:

full address:s:x.x.x.x:3389
prompt for credentials:i:1
administrative session:i:1
screen mode id:i:2
span monitors:i:1
use multimon:i:1
selectedmonitors:s:0,1

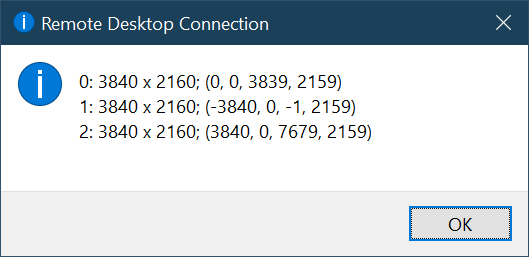
I can put on selectedmonitors:s:x,y and then use the zero-based numbers to indicate my monitors. To get a list of monitors, I can run mstsc /l to LIST out all my monitors on my machine. I can also use mstsc /multimon as a command line to use multiple monitors.

MSTSC /l showing a list of my monitors

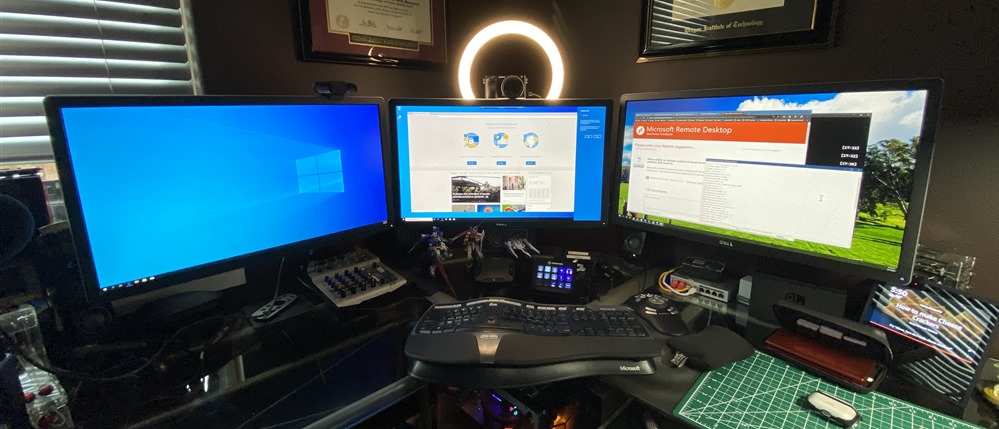
So I set my selectedmonitors:s:0,1 to use my left and middle monitor and skip my right one.

In this picture, I'm RDP'ed into a remote Windows 10 machine in Azure on Monitors 1 and 2 while Monitor 3 is my local one.

RDP on 1,2 and 3 is my local one

Sweet.


Sponsor: Protect your apps from reverse engineering and tampering with PreEmptive, makers of Dotfuscator. Dotfuscator has been in-the-box with Microsoft Visual Studio since 2003. Mention HANSELMAN for savings on a professional license!

About Scott

Scott Hanselman is a former professor, former Chief Architect in finance, now speaker, consultant, father, diabetic, and Microsoft employee. He is a failed stand-up comic, a cornrower, and a book author.

facebook bluesky subscribe
About   Newsletter
Hosting By
Hosted on Linux using .NET in an Azure App Service

Easily adding Security Headers to your ASP.NET Core web app and getting an A grade

March 24, 2020 Comment on this post [17] Posted in ASP.NET | Linux
Sponsored By

Well that sucks.

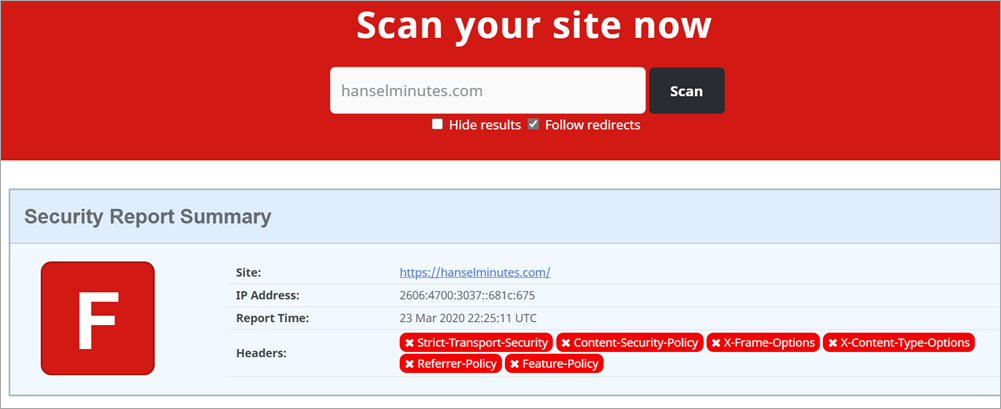
Score of F on SecurityHeaders.com

That's my podcast website with an F rating from SecurityHeaders.com. What's the deal? I took care of this months ago!

Turns out, recently I moved from Windows to Linux on Azure.

If I am using IIS on Windows, I can (and did) make a section in my web.config that looks something like this.

Do note that I've added a few custom things and you'll want to make sure you DON'T just copy paste this. Make yours, yours.

Note that I've whitelisted a bunch of domains to make sure my site works. Also note that I have a number of "unsafe-inlines" that are not idea.

<configuration>
<system.webServer>
<httpProtocol>
<customHeaders>
<add name="Strict-Transport-Security" value="max-age=31536000"/>
<add name="X-Content-Type-Options" value="nosniff"/>
<add name="X-Xss-Protection" value="1; mode=block"/>
<add name="X-Frame-Options" value="SAMEORIGIN"/>
<add name="Content-Security-Policy" value="default-src https:; img-src * 'self' data: https:; style-src 'self' 'unsafe-inline' www.google.com platform.twitter.com cdn.syndication.twimg.com fonts.googleapis.com; script-src 'self' 'unsafe-inline' 'unsafe-eval' www.google.com cse.google.com cdn.syndication.twimg.com platform.twitter.com platform.instagram.com www.instagram.com cdn1.developermedia.com cdn2.developermedia.com apis.google.com www.googletagservices.com adservice.google.com securepubads.g.doubleclick.net ajax.aspnetcdn.com ssl.google-analytics.com az416426.vo.msecnd.net/;"/>
<add name="Referrer-Policy" value="no-referrer-when-downgrade"/>
<add name="Feature-Policy" value="geolocation 'none';midi 'none';notifications 'none';push 'none';sync-xhr 'none';microphone 'none';camera 'none';magnetometer 'none';gyroscope 'none';speaker 'self';vibrate 'none';fullscreen 'self';payment 'none';"/>
<remove name="X-Powered-By" />
<remove name="X-AspNet-Version" />
<remove name="Server" />
</customHeaders>
</httpProtocol>
...

But, if I'm NOT using IIS - meaning I'm running my ASP.NET app in a container or on Linux - this will be ignored. Since I recently moved to Linux, I assumed (my bad for no tests here) that it would just work.

My site is hosted on Azure App Service for Linux, so I want these headers to be output the same way. There are several great choices in the form of Open Source NuGet libraries to help. If I use the ASP.NET Core middleware pipeline then these headers will be output and work the SAME on both Windows AND Linux.

I'll be using the NWebsec Security Libraries for ASP.NET Core. They offer a simple fluent way to add the headers I want.

TO BE CLEAR: Yes I, or you, can add these headers manually with AddHeader but these simple libraries ensure that our commas and semicolons are correct. They also offer a strongly typed middleware that is fast and easy to use.

Taking the same web.config above and translating it to Startup.cs's Configure Pipeline with NWebSec looks like this:

app.UseHsts(options => options.MaxAge(days: 30));
app.UseXContentTypeOptions();
app.UseXXssProtection(options => options.EnabledWithBlockMode());
app.UseXfo(options => options.SameOrigin());
app.UseReferrerPolicy(opts => opts.NoReferrerWhenDowngrade());

app.UseCsp(options => options
.DefaultSources(s => s.Self()
.CustomSources("data:")
.CustomSources("https:"))
.StyleSources(s => s.Self()
.CustomSources("www.google.com","platform.twitter.com","cdn.syndication.twimg.com","fonts.googleapis.com")
.UnsafeInline()
)
.ScriptSources(s => s.Self()
.CustomSources("www.google.com","cse.google.com","cdn.syndication.twimg.com","platform.twitter.com" ... )
.UnsafeInline()
.UnsafeEval()
)
);

There is one experimental HTTP header that NWebSec doesn't support (yet) called Feature-Policy. It's a way that your website can declare at the server-side "my site doesn't allow use of the webcam." That would prevent a bad guy from injecting local script that uses the webcam, or some other client-side feature.

I'll do it manually both to make the point that I can, but also that you aren't limited by your security library of choice.

NOTE: Another great security library is Andrew Lock's NetEscapades that includes Feature-Policy as well as some other great features.

Here's my single Middleware that just adds the Feature-Policy header to all responses.

//Feature-Policy
app.Use(async (context, next) =>
{
context.Response.Headers.Add("Feature-Policy", "geolocation 'none';midi 'none';notifications 'none';push 'none';sync-xhr 'none';microphone 'none';camera 'none';magnetometer 'none';gyroscope 'none';speaker 'self';vibrate 'none';fullscreen 'self';payment 'none';");
await next.Invoke();
});

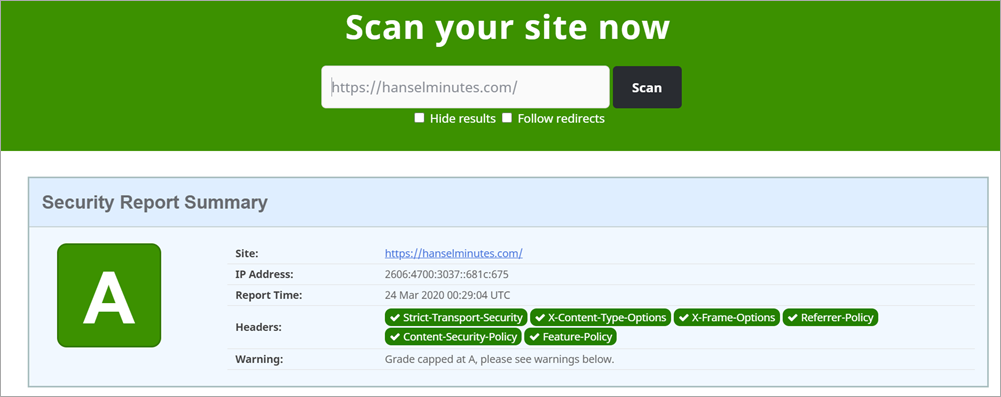
Now I'll commit, build, and deploy (all automatic for me using Azure DevOps) and scan the site again:

Score of A on SecurityHeaders.com

That was pretty straightforward and took less than an hour. Your mileage may vary but that's the general idea!


Sponsor: Protect your apps from reverse engineering and tampering with PreEmptive, makers of Dotfuscator. Dotfuscator has been in-the-box with Microsoft Visual Studio since 2003. Mention HANSELMAN for savings on a professional license!

About Scott

Scott Hanselman is a former professor, former Chief Architect in finance, now speaker, consultant, father, diabetic, and Microsoft employee. He is a failed stand-up comic, a cornrower, and a book author.

facebook bluesky subscribe
About   Newsletter
Hosting By
Hosted on Linux using .NET in an Azure App Service

Windows Terminal 1.0 is coming - Update now and set up your split pane hotkeys!

March 20, 2020 Comment on this post [11] Posted in Win10
Sponsored By

The Windows Terminal is free and in the Windows Store and you should go make sure you have the latest update. The v0.10 is out and it's got a number of lovely quality of life improvements, not the least of which is Mouse Support!

Mouse Support

What's that mean, doesn't it already support mice? This means Text-Mode mouse support. So your apps like tmux and Midnight Commander can receive and react to mouse events, event when you're ssh'ed in remotely! That's because it's using VT (virtual terminal) textual commands under the covers.

Mouse Support for text mode is super useful if you use apps like Midnight Commander under Linux, or if you split plans with tmux.

Split Pane

You can change Windows Terminal in any way with themes, colors, gifs, key bindings and more. Many of you use screen or tmux under Linux and you can and should do that.

Terminal also supports splitting natively and for any shell (remember terminal != console != shell) and they just added a lovely splitMode=duplicate that makes a copy of the shell/profile in focus.

NOTE: You might consider starting with a fresh profile if yours is getting out of control.

{
"keys": ["ctrl+shift+d"],
"command": {
"action": "splitPane",
"split": "auto",
"splitMode": "duplicate"
}
}

Here's my whole keybindings section right now, including the part above.

"keybindings": [
{
"command": "closeTab",
"keys": ["ctrl+w"]
},
{
"command": "newTab",
"keys": ["ctrl+t"]
},
{
"command": {
"action": "splitPane",
"split": "auto"
},
"keys": ["ctrl+|"]
},
{
"keys": ["ctrl+shift+d"],
"command": {
"action": "splitPane",
"split": "auto",
"splitMode": "duplicate"
}
}
],

So I can split with ctrl+shift+d and get a copy of whatever is in front. I can use ctrl+| to get my default terminal, and I can use ctrl+shift+w to close the pane in focus, while ctrl+w close the current tab. Yummy.

Currently, the Terminal teams says they are fixing bugs to prepare for the release of v1. Windows Terminal v1 will be released in May!


Sponsor: Couchbase gives developers the power of SQL with the flexibility of JSON. Start using it today for free with technologies including Kubernetes, Java, .NET, JavaScript, Go, and Python.

About Scott

Scott Hanselman is a former professor, former Chief Architect in finance, now speaker, consultant, father, diabetic, and Microsoft employee. He is a failed stand-up comic, a cornrower, and a book author.

facebook bluesky subscribe
About   Newsletter
Hosting By
Hosted on Linux using .NET in an Azure App Service

Disclaimer: The opinions expressed herein are my own personal opinions and do not represent my employer's view in any way.