Scott Hanselman

Announcing .NET Interactive - Try .NET includes .NET Notebooks and more

February 12, 2020 Comment on this post [13] Posted in DotNetCore | Open Source
Sponsored By

At Microsoft Ignite 2019, we were happy to announce that the "Try .NET global tool" added support for C# and F# Jupyter notebooks. Last week, the same team that brought you .NET Notebooks announced Preview 2 of the .NET Notebook.

Name Change - .NET interactive

As the scenarios for what was "Try .NET" continued to grow, the team wanted to a name that encompassed all the experiences they have as well as all the experiences they will have in the future. What was the Try .NET family of projects is now .NET interactive.

The F# community has enjoyed F# in Juypter Notebooks from years with the pioneering functional work of Rick Minerich, Colin Gravill and many other contributors! .NET Interactive is a family of tools and kernels that offer support across a variety of experiences as a 1st party Microsoft-supported offering.

.NET interactive is a group of CLI (command line interface) tools and APIs that enable users to create interactive experiences across the web, markdown, and notebooks.

.NET Interactive APIs and Tools

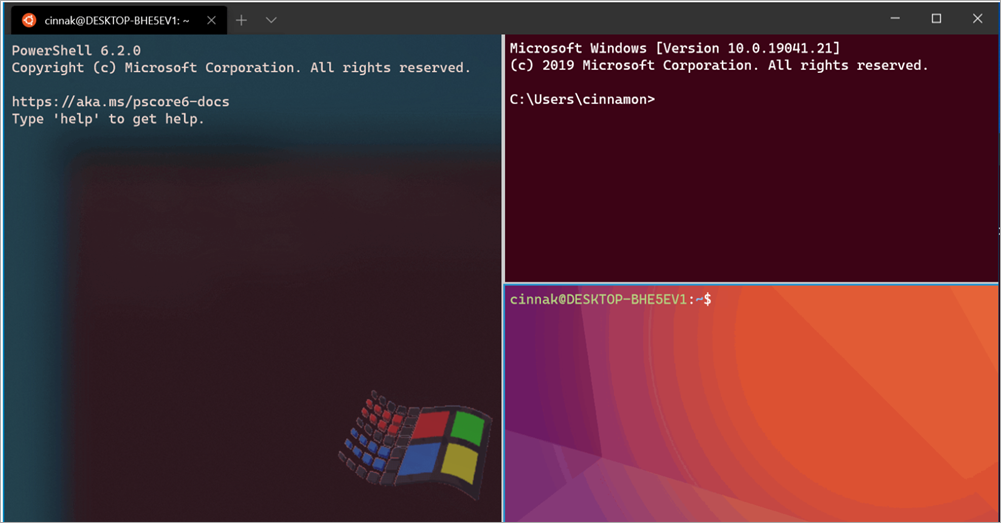
Here is what the command line looks like using the dotnet CLI.

  • dotnet interactive global tool:
  • dotnet try global tool:
    • Used for workshops and offline documentation. Interactive markdown with a backing project. I wrote about this in May 2019.
  • trydotnet.js API
    • Currently, only used internally at Microsoft, this API is used on the .NET page and C# documentation. Maybe one day I can use it on my blog? And yours?

Installing .NET Interactive

You can start playing with it today, locally or in the cloud! Seriously. Just click and start using it.

Before you install the .NET interactive global tool, please make sure you have the following:

> jupyter kernelspec list
  python3        ~\jupyter\kernels\python3
  • Open Windows terminal and install the dotnet interactive global tool:
> dotnet tool install --global Microsoft.dotnet-interactive
  • Switch back to Anaconda prompt and install the .NET kernel. To be clear, here we are using the dotnet CLI to let the Jupyter CLI know that we exist!
> dotnet interactive jupyter install
[InstallKernelSpec] Installed kernelspec .net-csharp in ~\jupyter\kernels\.net-csharp
.NET kernel installation succeeded

[InstallKernelSpec] Installed kernelspec .net-fsharp in ~\jupyter\kernels\.net-fsharp
.NET kernel installation succeeded

[InstallKernelSpec] Installed kernelspec .net-powershell in ~\jupyter\kernels\.net-powershell
.NET kernel installation succeeded
  • While still in Anaconda prompt, verify that .NET kernel is installed like this
> jupyter kernelspec list
  .net-csharp     ~\jupyter\kernels\.net-csharp
  .net-fsharp     ~\jupyter\kernels\.net-fsharp
  .net-powershell ~\jupyter\kernels\.net-powershell
  python3         ~\jupyter\kernels\python3

Now you can just run "jupyter lab" at the command line and you're ready to go!

More Languages - PowerShell

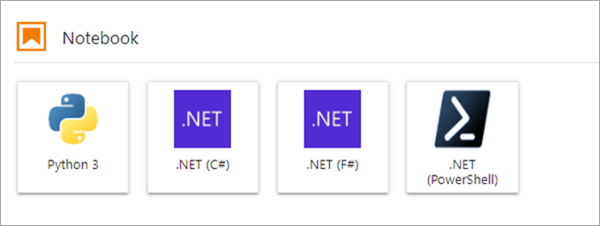
The .NET kernel now comes PowerShell support too! In Preview 2, the .NET interactive team partnered with PowerShell to enable this scenario. You can read more about the announcement of the PowerShell blog.

.NET in Jupyter Notebooks

The .NET interactive team is looking forward to hearing your thoughts. You can talk to them at https://github.com/dotnet/interactive

Multi .NET language Notebooks

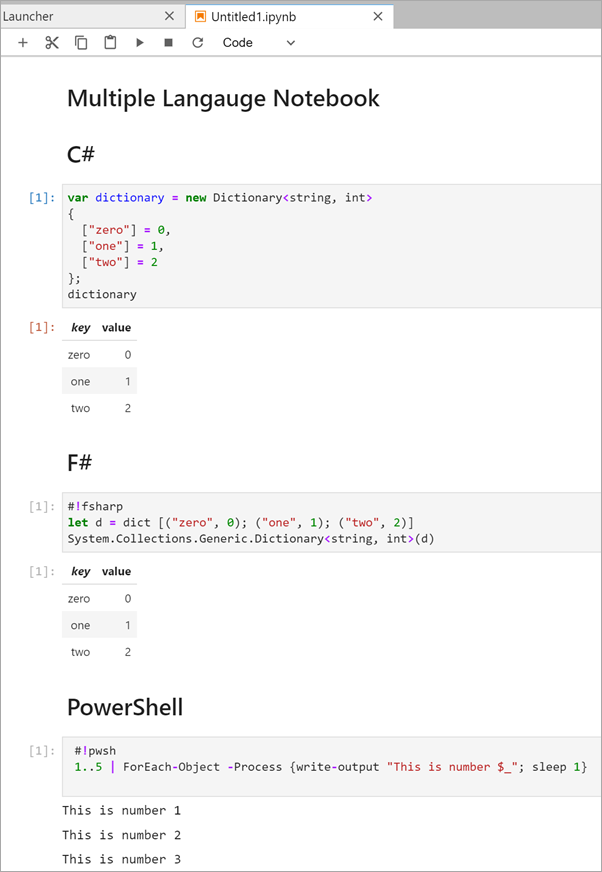
I wanted to highlight one of the hidden gems .NET interactive has had since Preview 1 - multi-language notebooks. That means that users can switch languages in a single notebook. Here is an example of a C#, F#, and PowerShell in a single .ipynb file.

Multiple Language Notebooks

Using one of the language magic commands (#!csharp, #!fsharp,#pwsh) tells the .NET Interactive kernel to run the cell in a specific language. To see a complete list of the available magic commands, enter the #!lsmagic command into a new cell and run it.

.NET Code in nteract.io

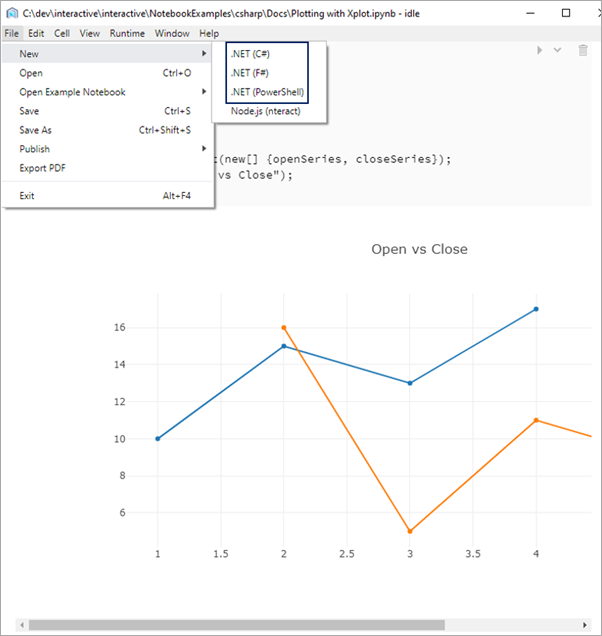
Additionally, you can now write .NET Code in nteract.io. Nteract is an open-source organization that builds SDKs, applications, and libraries that helps people make the most of interactive notebooks and REPLs. We are excited to have our .NET users take advantage of the rich REPL experience nteract provides, including the nteract desktop app.

Charts and graphs in nteract

To get started with .NET Interactive in nteract please download the nteract desktop app and install the .NET kernels.

Learn More

The team is looking forward to seeing what you build. Moving forward, the team has split dotnet try and dotnet interactive tools into separate repos.

  • For any issues, feature requests, and contributions to .NET Notebooks, please visit the .NET Interactive repo.
  • For any issues, feature requests, and contributions on interactive markdown and trydotnet.js, please visit the Try .NET repo.

Sponsor: Have you tried developing in Rider yet? This fast and feature-rich cross-platform IDE improves your code for .NET, ASP.NET, .NET Core, Xamarin, and Unity applications on Windows, Mac, and Linux.

About Scott

Scott Hanselman is a former professor, former Chief Architect in finance, now speaker, consultant, father, diabetic, and Microsoft employee. He is a failed stand-up comic, a cornrower, and a book author.

facebook bluesky subscribe
About   Newsletter
Hosting By
Hosted on Linux using .NET in an Azure App Service

Your Todo application is too complex or not complex enough

February 07, 2020 Comment on this post [2] Posted in DotNetCore | Open Source
Sponsored By

Reading Code is FunI've blogged before about ASP.NET Architect David Fowler's hidden gems in ASP.NET. His GitHub is worth following because he's always exploring and thinking and he's doing it in public. I love reading other people's source code.

He's been working on a local orchestrator called Micronetes that is worth reading about, but for this blog post I want to focus on his "Todos" repository.

Making a Todo List is a form of Hello World on the web, similar to making a blog or a simple website. Everyone knows what a Todo app should look and act like, so you can just focus on your tools and not on the requirements. You may feel that a Todo app "isn't complex enough" or isn't a good example app to make. That's fine, but it is worth exploring and reading the different ways the same thing can be done.

David's repository https://github.com/davidfowl/Todos is of note because it's not ONE Todo App. As of the time of this writing it's 8 todo apps, each with a different reason to exist.

What's a basic app look like? What if you add Auth? What if you add Dependency Injection? What about Controllers? You get the idea.

Some languages and platforms (*ahem* enterprise) get a reputation for being too complex, too layered, too many projects. Others may get the opposite reputation - that's a toy, it'll never scale (in size, traffic, size of team, whatever).

The point is that not everything is a hammer and not everything is a screw. You may think this is a cop out, but the answers is always "It depends." The more experience you get in software and the more mistakes you make and the more systems you put into production the more you'll realize that - wait for it - it depends. Disagree if you like, but one size doesn't fit all.

Some cool stuff about David's Todo code

All that said, there's some cool "before and afters" if you look at the code for earlier ideomatic C# and what newer APIs and language features allow. For example, if we assume some extensions and new APIs added for clarity, here's a POST

static async Task PostAsync(HttpContext context)
{
var todo = await context.Request.ReadJsonAsync<Todo>(_options);

using var db = new TodoDbContext();
await db.Todos.AddAsync(todo);
await db.SaveChangesAsync();

context.Response.StatusCode = StatusCodes.Status204NoContent;
}

and the GET

static async Task GetAllAsync(HttpContext context)
{
using var db = new TodoDbContext();
var todos = await db.Todos.ToListAsync();

await context.Response.WriteJsonAsync(todos, _options);
}

I personally do think that stuff like this is too complex. I hate that out parameter.

static async Task GetAsync(HttpContext context)
{
if (!context.Request.RouteValues.TryGet("id", out long id))
{
context.Response.StatusCode = StatusCodes.Status400BadRequest;
return;
}

using var db = new TodoDbContext();
var todo = await db.Todos.FindAsync(id);
if (todo == null)
{
context.Response.StatusCode = StatusCodes.Status404NotFound;
return;
}

await context.Response.WriteJsonAsync(todo);
}

This is made-up code from me that doesn't work. It's even still a little too much.

static async Task GetAsync(HttpContext context)
{
if (!RouteValues.Exist("id")) return Http.400;

using var db = new TodoDbContext();
var todo = await db.Todos.FindAsync(RouteValues["id"] as int);
if (todo == null) return Http.404

await Json(todo);
}

These are all useful exercises and are fun to explore. It also brings up some hard questions:

  • What is the difference between terse and clear versus obscure and inaccessible?
  • How important is the Law of Demeter?
  • Are some problems better solved by language changes or by main library changes?
  • How many things should/can be put into extension methods?
    • And when those basic scenarios break down, are you dropped into a Func<T<T<T<T<T<T>>>>> hellscape?

Do you enjoy reading code like this as much as I do, Dear Reader? I think it's a great learning tool. I could do a whole day-long class facilitating conversation around this code https://github.com/davidfowl/Todos

Enjoy!

About Scott

Scott Hanselman is a former professor, former Chief Architect in finance, now speaker, consultant, father, diabetic, and Microsoft employee. He is a failed stand-up comic, a cornrower, and a book author.

facebook bluesky subscribe
About   Newsletter
Hosting By
Hosted on Linux using .NET in an Azure App Service

Hundreds of practical ASP.NET Core samples to learn the fundamentals

February 05, 2020 Comment on this post [5] Posted in ASP.NET | DotNetCore | Open Source
Sponsored By

There's a growing world of .NET 101 samples out there. From our own http://dot.net/videos starter videos on YouTube (over 100 and adding more all the time!) to the whole .NET learning center where you can learn and practice C# online in your browser with no install!

There's also a new "Take your first steps with C#" 4 hour online Learning Path that you can also take entirely online!

image

Another great resource for learning and improving your coding skills is READING and exploring code.

Community member Dody Gunawinata has been amassing a wonderful online resource on their GitHub called Practical ASP.NET Core and you should definitely check it out and give the repository a star and a bookmark! If you are studying ASP.NET Core, Dody is often found on this Gitter Channel answering questions and generally being helpful.

Over 300 samples for ASP.NET Core 2.1, 2.2, 3.0 and 3.1 fundamentals

This is a massive amount of work. Check it out at https://github.com/dodyg/practical-aspnetcore and again, star it!

Kudos to Dody for doing it and I'd encourage you to get in there an help out!

He has lots of small compartmentalized samples that show you everything from Hello World (with increasingly complex and interesting bits layered on top) to lower level samples around WebSockets and building URIs.

Many of the samples are on .NET Core 2.1 as of the timing of this blog post, but Dody has an active 3.1 LTS Branch with updated ASP.NET 3.1 samples as well! Amazing!

Here's just a few of the resources on the Practical ASP.NET Repository:

I know Dody would appreciate the help and this is a great way for you to get involved in open source AND learn a little about ASP.NET. Check out the Contributor Guidelines! As they say, "There is no sample that is too small!"

About Scott

Scott Hanselman is a former professor, former Chief Architect in finance, now speaker, consultant, father, diabetic, and Microsoft employee. He is a failed stand-up comic, a cornrower, and a book author.

facebook bluesky subscribe
About   Newsletter
Hosting By
Hosted on Linux using .NET in an Azure App Service

Hosting your own NuGet Server and Feed for build artifacts with BaGet

January 31, 2020 Comment on this post [12] Posted in DotNetCore | NuGet
Sponsored By

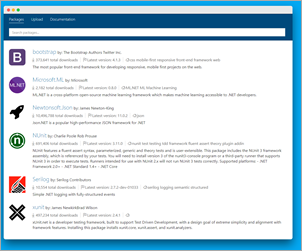
BaGet is a great NuGet alternativeNuGet is the package management system underlying the .NET programming platform. Just like Ruby Gems or NPM Packages, you can bring in 3rd party packages or make your own. The public repository is hosted at http://nuget.org BUT the magic is that there's alternatives! There are lots of alternative servers, as well as alterative clients like Paket.

There's a whole ecosystem of NuGet servers. You can get filtered views, authenticated servers, special virus scanned repositories, your own custom servers where your CI/CD (Continuous Integration/Continuous Deployment) system can publish daily (hourly?) NuGet packages for other teams to consume.

Ideally in a team situation you'll have one team produce NuGet Packages and publish them to a private NuGet feed to be consumed by other teams.

Here's just a few cool NuGet servers or views on NuGet.org:

  • FuGet.org
    • FuGet is "pro nuget package browsing!" Creating by the amazing Frank A. Krueger - of whom I am an immense fan - FuGet offers a different view on the NuGet package library. NuGet is a repository of nearly 150,000 open source libraries and the NuGet Gallery does a decent job of letting one browse around. However, https://github.com/praeclarum/FuGetGallery is an alternative web UI with a lot more depth.
  • Artifactory
    • Artifactory is a, ahem, factory for build artifacts of all flavors, NuGet being just one of them. You can even make your own internal cache of NuGet.org. You can remove or block access to packages you don't want your devs to have.
  • NuGet Gallery
    • You can just run your OWN instance of the NuGet.org website! It's open source
  • NuGet.Server
    • NuGet.Server is an MVP (Minimum Viable Product) of a NuGet Server. It's small and super lightweight but it's VERY limited. Consider using BaGet (below) instead.
  • GitHub Packages
    • GitHub has a package repository with a small free tier, and it also scales up to Enterprise size if you want a "SaaS" offering (software as a service)
  • Azure Artifacts
    • Azure Artifacts can also provide a SaaS setup for your NuGet packages. Set it up and forget it. A simple place for your automated build to drop your build artifacts.
  • MyGet
    • MyGet can hold packages of all kinds, including NuGet.They are well known for their license compliance system, so you can make sure your devs and enterprise are only using the projects your org can support.\
  • Sleet
    • Sleet is a NuGet v3 static feed generator. It's a Nuget Server, that's totally STATIC. Just like a static site generator this means that you can make feeds and host them directly on Azure Storage or Amazon S3 with no compute required.
  • LiGet
    • A NuGet server with a Linux-first approach
  • BaGet (pronounced baguette)
    • This is one of my favorites. It's a new fresh NuGet server written entirely in ASP.NET Core 3.1. It's cross platform, open source, and runs in Azure, AWS, Google Cloud, behind IIS, or via Docker. Lovely!  It's also a great example of some thoughtfully architected code, good plugin model, nice separation of concerns, and a good test suite. If you are using NuGet.Server now, move over to BaGet!

Let's focus on BaGet for now! Go give them some love/stars on GitHub!

Setting up a cross platform personal NuGet Server with BaGet

BaGet is a lovely little server. So far it supports:

The most initially powerful feature in my opinion is the Read-through caching.

This lets you index packages from an upstream source. You can use read-through caching to:

  1. Speed up your builds if restores from nuget.org are slow
  2. Enable package restores in offline scenarios

This can be great for folks on low bandwidth or remote scenarios. Put BaGet in front of your developers and effectively make a NuGet "edge CDN" that's private to you.

If you are familiar with Docker, you can get a BaGet NuGet server up in minutes. You can also use Azure or AWS or another cloud to store your artifacts in a scaleable way.

NOTE: You'll notice that the docs for things like "running BaGet on Azure" aren't complete. This is a great opportunity for YOU to help out and get involved in open source! Note that BaGet has a number of open issues on their GitHub *and* they've labeled some as "Good First Issue!"

If you want to try running BaGet without Docker, just

  1. Install .NET Core SDK
  2. Download and extract BaGet's latest release
  3. Start the service with dotnet BaGet.dll
  4. Browse http://localhost:5000/ in your browser

That's it! All the details on Getting Started with BaGet are on their GitHub. Go give them some love and stars.

About Scott

Scott Hanselman is a former professor, former Chief Architect in finance, now speaker, consultant, father, diabetic, and Microsoft employee. He is a failed stand-up comic, a cornrower, and a book author.

facebook bluesky subscribe
About   Newsletter
Hosting By
Hosted on Linux using .NET in an Azure App Service

Retrogaming by modding original consoles to remove moving parts and add USB or SD-Card support

January 29, 2020 Comment on this post [8] Posted in Gaming
Sponsored By

I'm a documented big fan of Retrogaming (playing older games and introducing my kids to those older games).

For example, we enjoy the Hyperkin Retron 5 in that it lets us play NES, Famicom, SNES, Super Famicom, Genesis, Mega Drive, Game Boy, Game Boy Color, & Game Boy over 5 category ports. with one additional adapter, it adds Game Gear, Master System, and Master System Cards. It uses emulators at its heart, but it requires the use of the original game cartridges. However, the Hyperkin supports all the original controllers - many of which we've found at our local thrift store - which strikes a nice balance between the old and the new. Best of all, it uses HDMI as its output plug which makes it super easy to hook up to our TV.

I've also blogged about modding/updating existing older consoles to support HDMI. On my Sega Dreamcast I've been very happy with this Dreamcast to HDMI adapter (that's really internally Dreamcast->VGA->HDMI).

The Dreamcast was lovely

When retrogaming there's a few schools of thought:

  • Download ROMs and use emulators - I try not to do this as I want to support small businesses (like used game stores, etc) as well as (in a way) the original artists.
  • Use original consoles with original cartridges
  • Use original consoles with backup images through an I/O mod.
    • I've been doing this more and more as many of my original consoles' CD-ROMs and other moving parts have started to fail.

It's the failure of those moving parts that is the focus of THIS post.

For example, the CD-ROM on my Panasonic 3DO Console was starting to throw errors and have trouble spinning up so I was able to mod it to load the CD-ROMs (for my owned discs) off of USB.

This last week my Dreamcast's GD-ROM finally started to get out of alignment.

Fixing Dreamcast Disc Errors

You can can align a Dreamcast GD-ROM by opening it up by removing the four screws on the bottom. Lift up the entire GD-ROM unit without pulling too hard on the ribbon cable. You may have to push the whole laser (don't touch the lens) back in order to flip the unit over.

Then, via trial and error, turn the screw shown below to the right about 5 degrees (very small turn) and test, then do it again, until your drive spins up reliably. It took me 4 tries and about 20 degrees. Your mileage may vary.

The Dreamcast GD-ROM just pops outTake out the whole GD-ROM

Turn this screw to align your laser on your Dreamcast

This fix worked for a while but it was becoming clear that I was going to eventually have to replace the whole thing. These are moving parts and moving parts wear out.

Adding solid state (SD-Card) storage to a Dreamcast

Assuming you, like me, have a VA1 Dreamcast (which is most of them) there are a few options to "fake" the GD-ROM. My favorite is the GDEMU mod which requires no soldering and can be done in just a few minutes. You can get them directly or on eBay. I ordered a version 5.5 and it works fantastically.

You can follow the GDEMU instructions to lay out a FAT32 formatted SD Card as it wants it, or you can use this little obscure .NET app called GDEMU SD Card Maker.

The resulting Dreamcast now has an SD Card inside, under where the GD-ROM used to be. It works well, it's quiet, it's faster than the GD-ROM and it allows me to play my backups without concern of breaking any moving parts.

Modded Dreamcast

Other small Dreamcast updates

As a moving part, the fan can sometimes fail so I replaced fan my using a guide from iFixit. In fact, a 3-pin 5V Noctua silent fan works great. You can purchase that fan plus a mod kit with a 3d printed adapter that includes a fan duct and conversion gable with 10k resistor, or you can certainly 3D print your own.

If you like this kind of content, go follow me on Instagram!


Sponsor: When you use my Amazon.com affiliate links to buy small things it allows me to also buy small things. Thanks!

About Scott

Scott Hanselman is a former professor, former Chief Architect in finance, now speaker, consultant, father, diabetic, and Microsoft employee. He is a failed stand-up comic, a cornrower, and a book author.

facebook bluesky subscribe
About   Newsletter
Hosting By
Hosted on Linux using .NET in an Azure App Service

Disclaimer: The opinions expressed herein are my own personal opinions and do not represent my employer's view in any way.