Scott Hanselman

How to fix dfu-util, STM, WinUSB, Zadig, Bootloaders and other Firmware Flashing issues on Windows

September 11, 2019 Comment on this post [2] Posted in Hardware | Open Source
Sponsored By

Flashing devices wtih dfu-utilI'm pretty happy with Windows 10 as my primary development box. It can do most anything I want, run a half-dozen Linuxes, and has a shiny new open source Terminal, and has great support for Docker now.

However.

For years - YEARS I SAY - Windows has been a huge hassle when you want to flash the firmware of various devices over USB.

The term "dfu" means Device Firmware Update and dfu-util is the Device Firmware Update Utility, natch.

Very often I'll find myself with a device like a Particle Photon, Wilderness Labs Meadow, or some STM32 device that uses the ST Bootloader.

The Mac and Linux instructions usually say something like "plug it in and party on" but folks like myself with Windows have to set up a WinUSB Driver (libusb-win32 or libusbK) as dfu-util uses those libraries to speak to USB devices.

If you plug in a device, the vast majority of Windows users want the device to 'just work.' My non-technical parent doesn't want Generic USB drivers so they can flash the firmware on their mouse. I, however, as an aristocrat, sometimes want to do low-level stuff and flash an OS on a Microcontroller.

Today, the easiest way to swap the "inbox" driver with WinUSB is using a utility called Zadig. Per their docs:

Zadig is a Windows application that installs generic USB drivers,
such as WinUSB, libusb-win32/libusb0.sys or libusbK, to help you access USB devices.

It can be especially useful for cases where:

  • you want to access a device using a libusb-based application
  • you want to upgrade a generic USB driver
  • you want to access a device using WinUSB

If you follow the instructions when flashing a device and don't have the right USB driver installed you'll likely get an error like this:

Cannot open DFU device 0483:df11

That's not a lot to go on. The issue is that the default "inbox" driver that Windows uses for devices like this isn't set up for Generic USB access with libraries like "libusb."

Install a generic USB driver for your device - WinUSB using Zadig

Run Zadig and click Options | List All Devices.

Here you can see me finding the ST device within Zadig and replacing the driver with WinUSB. In my case the device was listened under STM32 Bootloader. Be aware that you can mess up your system if you select something like your WebCam instead of the hardware device you mean to select.

In Zadig, select the STM32 Bootloader

In this state, you can see in the Device Manager that there's an "STM Device in DFU Mode."

STM Device in DFU Mode

Now I run Zadig and replace the driver with WinUSB. Here's the result. Note the SUCCESS and the changed Driver on the left.

Replace it with WinUSB

Here the STM32 Bootloader device now exists in Universal Serial Bus Devices in Device Manager.

STM32 Bootloader

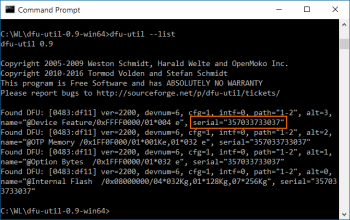
Now I can run dfu-util --list again. Note the before and after in the screenshot below. I run dfu-util --list and it finds nothing. I replace the bootloader with the generic WinUSB driver and run dfu-util again and it finds the devices.

Flashing devices with dfu-util

At this point I can follow along and flash my devices per whatever instructions my manufacturer/project/boardmaker intends.

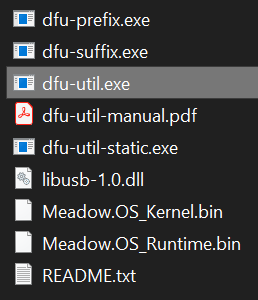
NOTE: When using dfu-util on Windows, I recommend you either be smart about your PATH and add dfu-util, or better yet, make sure the dfu-util.exe and libusb.dlls are local to your firmware so there's no confusion about what libraries are being used.
Keep dfu-util and libusb together

I'd love to see this extra step in Windows removed, but for now, I hope this write up makes it clearer and helps the lone Googler who finds this post.


Sponsor: Develop Xamarin applications without difficulty with the latest JetBrains Rider: Xcode integration, JetBrains Xamarin SDK, and manage the required SDKs for Android development, all right from the IDE. Get it today

About Scott

Scott Hanselman is a former professor, former Chief Architect in finance, now speaker, consultant, father, diabetic, and Microsoft employee. He is a failed stand-up comic, a cornrower, and a book author.

facebook bluesky subscribe
About   Newsletter
Hosting By
Hosted on Linux using .NET in an Azure App Service

Visual Studio now includes an integrated Terminal

September 06, 2019 Comment on this post [9] Posted in VS2019
Sponsored By

It's early days (preview) but there's now a Terminal integrated into Visual Studio! Taking a nod from the 2017 plugin, the Terminal is now build in as an experimental feature using features from the NEW open source Windows Terminal.

Rather than build everything from scratch, the Visual Studio terminal shares most of its core with the Windows Terminal!

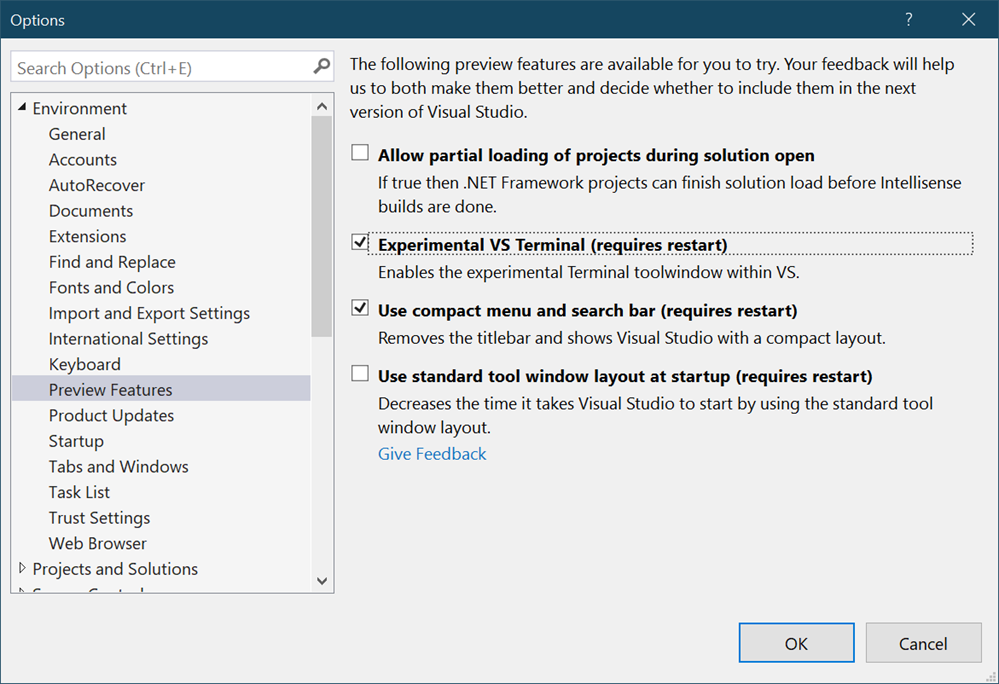
assuming you have Visual Studio 2019 16.3 Preview 3 or above, you’ll want to enable it by visiting the Preview Features page. Go to Tools > Options > Preview Features, enable the Experimental VS Terminal option and restart Visual Studio.

Tools > Options > Preview Features, enable the Experimental VS Terminal option and restart Visual Studio.

Make sure you restart after changing this option.

It's super early days and there's lots of things coming.

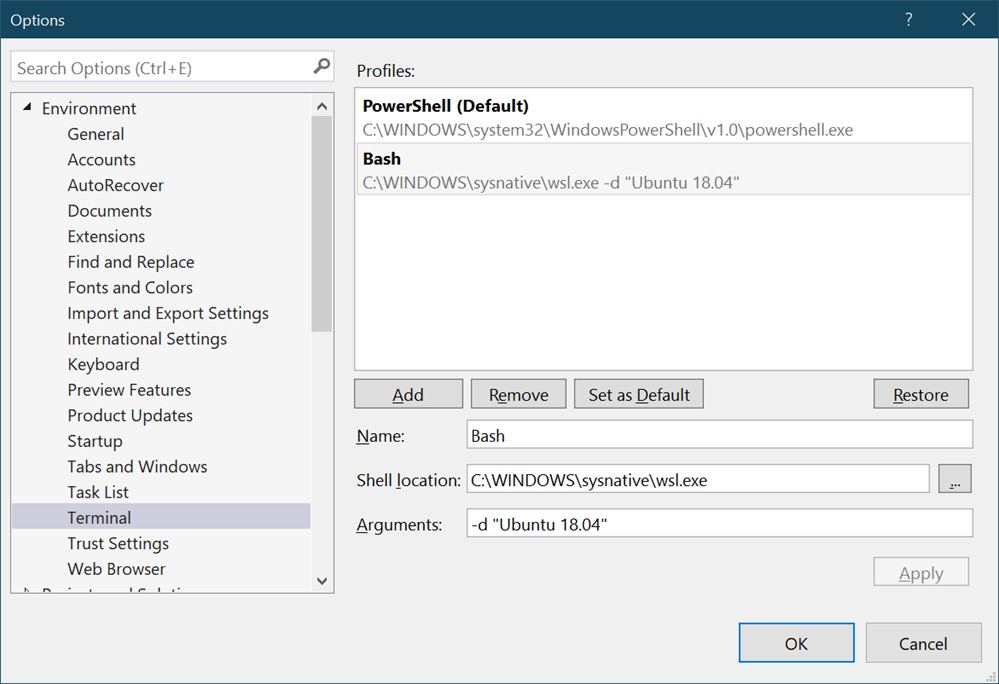
You can set up Profiles but you can't use them yet as the default is the only one used. In the future the Integrated Terminal will add a dropdown and + button like the Windows Terminal.

Multiple Profiles for the VS Integrated Terminal

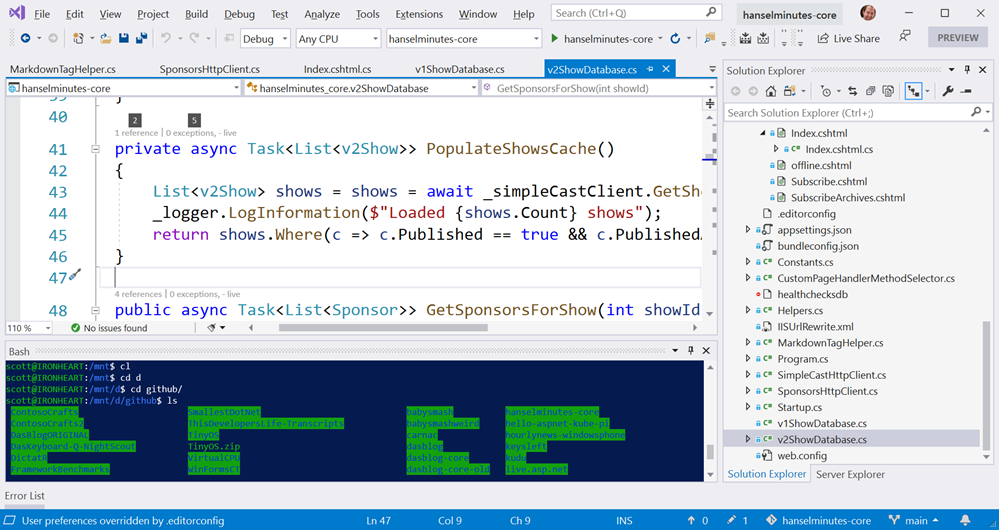
Also note that if you want to integrate WSL (bash) you'll want to select c:\windows\sysnative\wsl.exe and pass in your preferred Distribution. Here you can see me running Ubuntu inside of VS2019. Sweet.

A terminal inside VS!

Grab the Preview of 16.3p3 now or wait a bit and you'll see more and more updates to the new VS Integrated Terminal in the coming months!


Sponsor: Uno Platform is the Open Source platform for building single codebase, native mobile, desktop and web apps using only C# and XAML. Built on top of Xamarin and WebAssembly! Check out the Uno Platform tutorial!

About Scott

Scott Hanselman is a former professor, former Chief Architect in finance, now speaker, consultant, father, diabetic, and Microsoft employee. He is a failed stand-up comic, a cornrower, and a book author.

facebook bluesky subscribe
About   Newsletter
Hosting By
Hosted on Linux using .NET in an Azure App Service

Introducing open source Windows 10 PowerToys

September 04, 2019 Comment on this post [6] Posted in Win10
Sponsored By

Microsoft Windows PowerToysYesterday the Windows Team announced the first preview and code release of PowerToys for Windows 10. This first preview includes two utilities:

Many years ago there was PowerToys for Windows 95 and frankly, it's overdue that we have them for Windows 10 – and bonus points for being open source!

These tools are also open source and hosted on GitHub! Maybe you have an open source project that's a "PowerToy?" Let me know in the comments. A great example of a PowerToy is something that takes a Windows Features and turns it up to 11!

EarTrumpet is a favorite example of mine of a community "PowerToy." It takes the volume control and the Windows auto subsystem and tailors it for the pro/advanced user. You should definitely try it out!

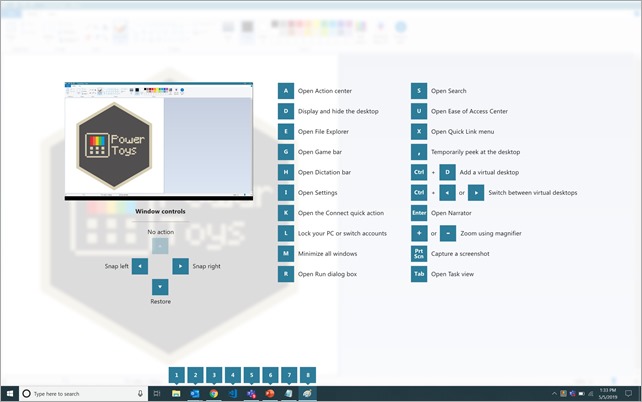
As for these new Windows 10 Power Toys, here’s what the Windows key shortcut guide looks like:

PowerToys - Shortcut Guide

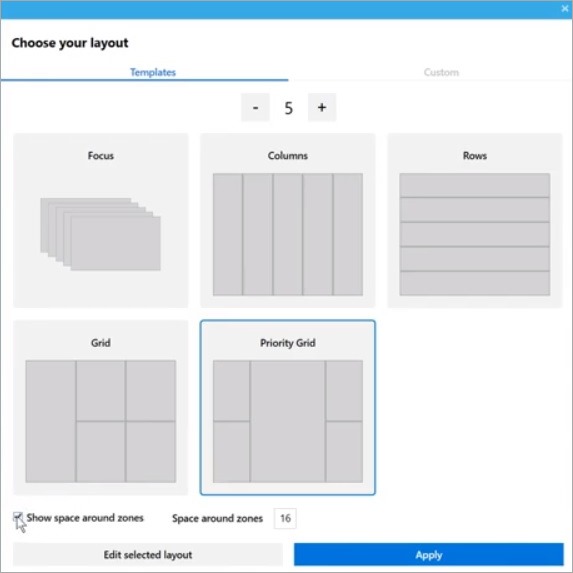
And here's Fancy Zones. It's very sophisticated. Be sure to watch the YouTube to see how to use it.

Fancy Zones

To kick the tires on the first two utilities, download the installer here.

The main PowerToys service runs when Windows starts and a user logs in. When the service is running, a PowerToys icon appears in the system tray. Selecting the icon launches the PowerToys settings UI. The settings UI lets you enable and disable individual utilities and provides settings for each utility. There is also a link to the help doc for each utility. You can right click the tray icon to quit the Power Toys service.

We'd love to see YOU make a PowerToy and maybe it'll get bundled with the PowerToys installer!

How to create new PowerToys

See the instructions on how to install the PowerToys Module project template.
Specifications for the PowerToys settings API.

We ask that before you start work on a feature that you would like to contribute, please read our Contributor's Guide. We will be happy to work with you to figure out the best approach, provide guidance and mentorship throughout feature development, and help avoid any wasted or duplicate effort.

Additional utilities in the pipeline are:

If you find bugs or have suggestions, please open an issue in the Power Toys GitHub repo.


Sponsor: Uno Platform is the Open Source platform for building single codebase, native mobile, desktop and web apps using only C# and XAML. Built on top of Xamarin and WebAssembly! Check out the Uno Platform tutorial!

About Scott

Scott Hanselman is a former professor, former Chief Architect in finance, now speaker, consultant, father, diabetic, and Microsoft employee. He is a failed stand-up comic, a cornrower, and a book author.

facebook bluesky subscribe
About   Newsletter
Hosting By
Hosted on Linux using .NET in an Azure App Service

Deploying a MSDeploy-packaged Web application to a Linux Azure App Service with Azure DevOps

August 30, 2019 Comment on this post [9] Posted in Azure
Sponsored By

For bizarre and unknown historical reasons, when using MSDeploy to make a ZIP package to upload a website to a web server you get a massively deep silly path like yada/yada/C_C/Temp/package/WebApplication1/obj/Release/Package/PackageTmp. I use .NET Core so I usually do a "dotnet publish" and get a sane path for my build artifacts in my CI/CD (Continues Integration/Continuous Deployment) pipeline.

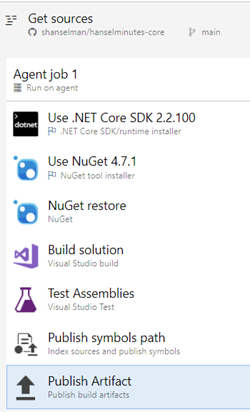
I'm using the original pipeline editor on free Azure DevOps (I'm still learning DevOps YAML for this, and this visual pipeline editor IMHO is more friendly for getting started.

However, I'm using a "Visual Studio Build" task which is using MSDeploy and these MSBuild arguments.

/p:DeployOnBuild=true 
/p:WebPublishMethod=Package
/p:PackageAsSingleFile=true
/p:SkipInvalidConfigurations=true
/p:PackageLocation="$(build.artifactstagingdirectory)\\"

Azure Dev OpsLater on in the process I'm taking this package/artifact - now named "drop.zip" and I'm publishing it to Azure App Service.

I'm using the "Azure App Service Deploy" task in the DevOps release pipeline and it works great when publishing to a Windows Azure App Service Plan. Presumably because it's using, again, MSDeploy and it knows about these folders.

However, I wanted to also deploy to a Linux Azure App Service. Recently there was a massive (near 35%) price drop for Premium App Services. I'm running an S1 and I can move to a P1V2 and get double the memory, move to SSDs, and get double the perf for basically the same money. I may even be able to take TWO of my S1s and pack all my websites (19 at this point) into just one Premium. It'll be faster and way cheaper.

Trick is, I'll need to move my Windows web apps to Linux web app. That's cool, since I'm using .NET Core - in my case 2.1 and 2.2 - then I'll just republish. I decided to take my existing Azure DevOps release pipeline and just add a second task to publish to Linux for testing. If it works I'll just disable the Windows one. No need to rebuild the whole pipeline from scratch.

Unfortunately the Linux Azure App Service has its deployment managed as a straight ZIP deployment; it was ending up with a TON of nested folders from MSDeploy!

NOTE: If I'm giving bad advice or I am missing something obvious, please let me know in the comments! Perhaps there's a "this zip file has a totally bonkers directory structure, fix it for Linux" checkbox that I missed?

I could redo the whole build pipeline and build differently, but I'd be changing two variables and it already works today on Windows.

I could make another build pipeline for Linux and build differently, but that sounds tedious and again, a second variable. I have a build artifact now, it's just in a weird structure.

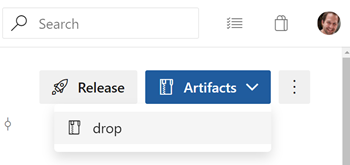
How did I know the build artifact had a weird folder structure? I remember that I could just download any build artifact and look at it! Seems obvious when you say it but it's a good reminder that all these magical black box processes that move data from folder to folder are not black boxes - you can always check the result of a step. The output of one step becomes the input to the next.

downloading an artifact from Azure DevOps

I should probably have a Windows Build and Linux Build (two separate build agents) but the site isn't complex enough and it doesn't do anything that isn't clearly cross-platform friendly.

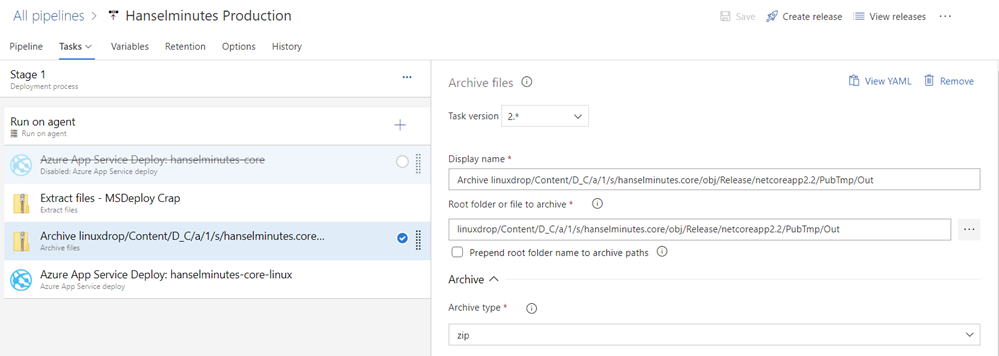
Anthony Chu suggested that I just remove the folders by restructuring the zip file (unzipping/zipping it). Could be a simple way to get both Windows and Linux publishing from a single artifact. I can fix it all up with a fresh build and release pipeline another time when I have the energy to learn this YAML format. (Speaking of the Azure DevOps YAML which doesn't have a friendly editor or validator, not speaking of YAML as a generic concept)

Unzipping and zipping up MSDeploy mess

I unzip the weird folder structure, then zip it back up from a new root. It then cleanly deploys to the Linux Azure App Service from the same artifact I made built for the Windows App Service.

Ironically here's a YAML view of the tasks, although I build them with the visual editor.

steps:
- task: ExtractFiles@1
displayName: 'Extract files - MSDeploy Crap'
inputs:
destinationFolder: linuxdrop
steps:
- task: ArchiveFiles@2
displayName: 'Archive linuxdrop/Content/D_C/a/1/s/hanselminutes.core/obj/Release/netcoreapp2.2/PubTmp/Out'
inputs:
rootFolderOrFile: 'linuxdrop/Content/D_C/a/1/s/hanselminutes.core/obj/Release/netcoreapp2.2/PubTmp/Out'
includeRootFolder: false
steps:
- task: AzureRmWebAppDeployment@4
displayName: 'Azure App Service Deploy: hanselminutes-core-linux'
inputs:
azureSubscription: 'Azure MSDN)'
appType: webAppLinux
WebAppName: 'hanselminutes-linux'
packageForLinux: '$(Build.ArtifactStagingDirectory)/$(Build.BuildId).zip'
RuntimeStack: 'DOTNETCORE|2.2'

Just to be clear, this isn't standard and it's a pretty rare edge case and it may not work for everyone but isn't it nice to google for a super rare edge case and instead of feeling all alone you find an answer?


Sponsor: Looking for a tool for performance profiling, unit test coverage, and continuous testing that works cross-platform on Windows, macOS, and Linux? Check out the latest JetBrains Rider!

About Scott

Scott Hanselman is a former professor, former Chief Architect in finance, now speaker, consultant, father, diabetic, and Microsoft employee. He is a failed stand-up comic, a cornrower, and a book author.

facebook bluesky subscribe
About   Newsletter
Hosting By
Hosted on Linux using .NET in an Azure App Service

Totally unsupported hacks - Add Windows Terminal to the Win+X Shortcut menu

August 28, 2019 Comment on this post [13] Posted in Win10
Sponsored By

You shouldn't do this and if you choose to do this you may hurt yourself or one of your beloved pets.

You have been warned.

The Windows+X hotkey has been around for many years as is a simple right-click style context list of Developer/Administrator stuff that your techies might need in the course of human events.

There's one obscure setting in Settings | Taskbar where you can set the main option for the Command Prompt to be replaced with PowerShell, although that was flipped to "on" by default many years ago.

Replace Command Prompt with PowerShell

I want Windows Terminal in that Win+X menu.

Fast Forward to a world with lots of alternative console hosts, Linux running on Windows natively, not to mention cross-platform open source PowerShell Core, AND the new open source Windows Terminal (that you can just go download right now in the Windows Store) we find ourselves in a middle place. We want to replace the default console with the Windows Terminal everywhere as the default but that's gonna be a while.

Until then, we can integrate the Windows Terminal into our lives in a few obvious ways.

  • Pin Windows Terminal to your taskbar
  • Train yourself to Win+R and run "wt" rather than "cmd.exe" at wt.exe is a shim that launches the store-based Windows Terminal.
  • Add Windows Terminal to the Win+X menu.

It is that last one that concerns me today.

The Win+X implementation is a totally bonkers thing that I just don't understand with its origins lost to the mist of forgotten time.

You can go check out C:\Users\USERNAME\AppData\Local\Microsoft\Windows\WinX and find it full of LNK files. Just drop yours in there, right? Well, I say nay nay!

They didn't want just anyone dropping stuff in there so to add a new application to Windows+X you need to:

  • Make or find a LNK file for your application.
    • BUT! Your lnk file can't (today?) be a LNK to a Windows Store app - more on that later. They appear to be ignored today.
  • Store a special hash in your LNK file per Rafael's excellent writeup here so that they are considered "Approved Links."
  • Make a new Group 4 folder in the \WinX folder above OR update Group 3 and copy your link in there considering the numbering scheme.
    • Note the ordering in the registry at HKEY_LOCAL_MACHINE\SOFTWARE\Microsoft\Windows\CurrentVersion\ShellCompatibility\InboxApp

OR

Here's my WinX\Group3 folder . Note the shortcut at the top there.

image

I wanted to find a link to the Windows Terminal but it's harder than it looks. I can't find a real LNK file anywhere on my system. BUT I was able to find a synthetic one and make a copy by going "Win+R" and running "shell:AppsFolder" which brings you to a magic not-a-folder folder.

Not a folder folder

That is a folder of lies. I tried making a copy of this LNK, moving it to my deskop, hashing it with Rafael's util but it's ignored, presumably because it's a Windows Store LNK. Instead, I'll head out to cmd.exe and type "where wt.exe" to find the wt.exe shim and make a link to that!

C:\Users\scott>where wt.exe
C:\Users\scott\AppData\Local\Microsoft\WindowsApps\wt.exe

These files are also lies, but lies of a another type. Zero byte lies.

Zero Byte Lies

Right-click wt.exe and Create Shortcut. Then drag that shortcut out of there and into somewhere else like your Desktop. You can then use hashlnk and move it to the WinX folder.

OR, you can use this scary and totally unsupported utility hosted at a questionable website that you have no business visiting. It's called Win+X Menu Editor and it was a chore to download. So much so that I'm going to hide a copy in my DropBox for the day in the near future when this utility and website disappear.

Be careful when you go download this utility, the site is full of scary links that say Download Now but they are all lies. You want the subtle text link that points to a ZIP file, just above the Donate button that says "Download Win+X Menu Editor."

In this utility you can add an item that points to your new WT.LNK file and it will use Rafael's code and copy the LNK file to the right place and re-number stuff if needed. Again, be careful as you never know. You might mess up your whole life with stuff like this. It worked for me.

Win+X Menu Editor

And there you go.

Windows Terminal in the WIN+X menu

Lovely. Now IMHO in some ideal future this should just happen out of the box, but until then it's nice to know I can do it myself.


Sponsor: Looking for a tool for performance profiling, unit test coverage, and continuous testing that works cross-platform on Windows, macOS, and Linux? Check out the latest JetBrains Rider!

About Scott

Scott Hanselman is a former professor, former Chief Architect in finance, now speaker, consultant, father, diabetic, and Microsoft employee. He is a failed stand-up comic, a cornrower, and a book author.

facebook bluesky subscribe
About   Newsletter
Hosting By
Hosted on Linux using .NET in an Azure App Service

Disclaimer: The opinions expressed herein are my own personal opinions and do not represent my employer's view in any way.