Scott Hanselman

Good, Better, Best creating the ultimate remote worker webcam setup on a budget

August 07, 2019 Comment on this post [4] Posted in Remote Work
Sponsored By

I've been a remote worker and an occasional YouTuber for well over a decade. I'm always looking for a better setup because the goal is clear - how can I interact with you and my co-workers in a way that has high-enough fidelity that I don't need to drive to Seattle every week!

I believe if my camera is clear and my audio is clear than I can really have a remote relationship with my team that is effective and true.

Everyone has a webcam these days and can just get on a video call and have a chat - but is it of sufficient quality that you feel like you're really having a good conversation with folks and truly connecting!

Here's a shot of my setup during a meeting I'm in here at Microsoft:

My setup - webcam and camera

Here's my thoughts on Good, Better, add Best set-ups for remotes and YouTubers without spending thousands.

Good

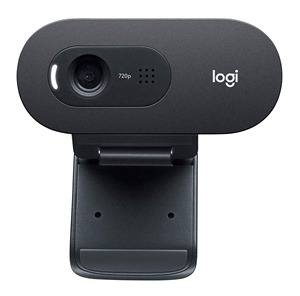
  • High quality video for Webcams and RemotesThe Logitech C270 Webcam can be gotten for as little as $20 or less! It's wholly adequate with enough light.
    • It only does 720p and it's USB2 so I can't enthusiastically recommend it but it's OK again, if you throw light at it. In the dark is just a webcam.
      Logitech C270
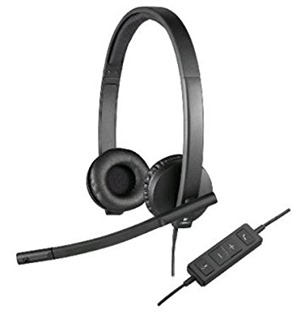
  • The Logitech USB Headset H570 is decent, as is the lovely Jabra UC Voice corded headset. I prefer the Jabra because it only covers one ear and doesn't give me the "two covered ears" claustrophobic feeling.
    • To be clear - audio quality matters. Any crappy headset (or quality one as above) will ALWAYS be better than your webcam's default or your laptop's default. Always. Mics need to be closer to your mouth to sound good.
      31kFcFWgIL
  • Small webcam Ringlight.
    • Light light light. Webcams, especially cheap ones NEED LIGHT. It feels weird and I get it but the quality is SO MUCH BETTER with some decent fill light. Get a ring light that's powered by USB and use it on calls. Yes, it looks ridiculous but it WORKS.
      Ringlight

Better

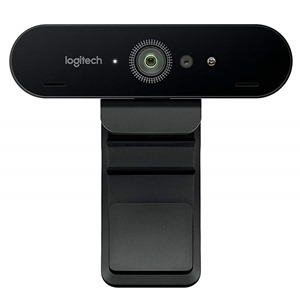
Logitech BrioHow can we improve on the GOOD setup. Clearer videos and better sound/sound feel.

Some folks feel the Logitech Brio is overhyped and I think that's fair. It's a "4k" camera that's not as impressive as it should be. That said, it's a solid camera and arguably the best Logitech has to offer.

If I could suggest a middle of the road solid "BETTER" setup for a remote worker, I'd recommend these

The lights are the magic.

Now, moving beyond USB headsets, I love adding speakerphones - not for the mic, literally for the speaker. I love the Plantronics Portable USB Speakerphone. Requires no drivers, it just shows up as a mic and speaker automatically. I have it front and center in front of my monitor and I use it every day. It makes me feel like my Home Office is a real Office somehow.

Plantronics Calisto 610-M Portable USB Speakerphone

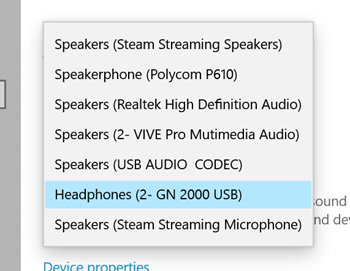
If conversations are private I'll use the headset above for the audio but when I want the sound to "come from the monitor" I'll SPLIT the audio. This is a pro tip. You can set up the Mic input as the headset mic and the Speaker output as a Speakerphone (or your main speakers). I like using the Speakerphone for voice and keeping the computer's output as the main speakers. Having this separate of voice and computer sounds is a small trick I play on myself but it helps to create a sense of location where the remote video person comes out of separate speakers.

Selecting Output Speakers

Best

Let's spend a little bit of money, but not so much that we break the bank.

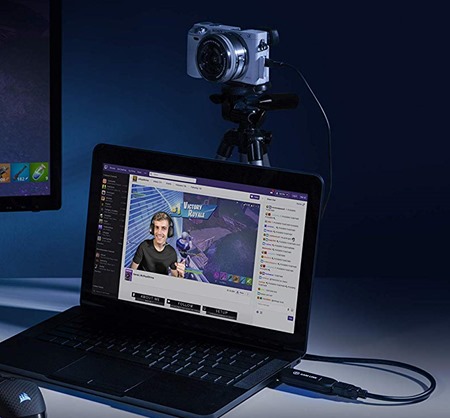
I'm going to make my own webcam. Rather than a plastic of the shelf single webcam, let's take an actual mirrorless camera - the kind you'd take to a photography class - and make it a HIGH QUALITY webcam.

We need a great camera and it needs to support HDMI out. The camera also needs to be able to stay on all day long, not overheat, and it needs to run on AC power (not on battery).

Here's a list of cameras that have clean HDMI out and can stay on all day. You might have one of these cameras in your closet! I like the Sony A6000 and here's its characteristics.

  • Sony A6000 - I found this on Craigslist for $300.
    • Max resolution: 1080p and a buttery smooth 60fps
    • Clean HDMI: Yes
    • Unlimited runtime: Yes
    • Connection type: Micro HDMI
    • Power: Dummy Battery
    • Verified by: Elgato
    • Notes: Requires dummy battery for power (sold separately) Retains full autofocus with clean HDMI output
      Sony A6000
  • I need a "dummy battery" for this camera. Turns out this is a whole class of thing you can buy. Who knew?
  • This camera has micro-HDMI so I need a micro-HDMI to HDMI cable.
  • Now this is just a loose camera, so how I will mount it on my monitor?
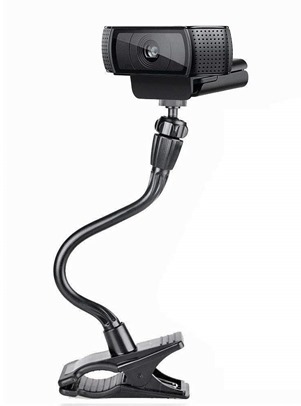
    • I like mounting it INSIDE the Ring Light. If you don't want the light you can just get this clamp mount.
    • Or you can do what I did - get the CLAMP then the LIGHT and then put the CAMERA in that like a sandwic
      Flexible Jaws Clamp Clip Mount Holder
  • This camera and cameras like it output HDMI and I need that HDMI to be inputted into my computer and I want the HDMI output of the camera to look like it's a regular Webcam. The magical device that does this for us is the Elgato CamLink 4k. It's literally a little stick with HDMI input on one end and a USB3 on the other side. It took 5 minutes to install.
    • This device also has the added benefit of being a generic "capture card" if you want to record or broadcast your gaming consoles OR other computers!

      Elgato CamLink 4k

Here's a YouTube video I made that shows you these cameras, before and after - Good, Better, and BEST!

Logitech Brio vs Sony A6000 with Elgato Camlink 4k - No Contest

What do you think? Thanks to John Miller and Jeff Fritz for their help and guidance!

* I use Amazon referral links and donate the little money to my kids' school. You support charter schools when you use these links.


Sponsor: OzCode is a magical debugging extension for C#/.NET devs working in Visual Studio. Get to the root cause of your bugs faster with heads-up display, advanced search inside objects, LINQ query debugging, side-by-side object comparisons & more. Try for free!

About Scott

Scott Hanselman is a former professor, former Chief Architect in finance, now speaker, consultant, father, diabetic, and Microsoft employee. He is a failed stand-up comic, a cornrower, and a book author.

facebook bluesky subscribe
About   Newsletter
Hosting By
Hosted on Linux using .NET in an Azure App Service

Dotnet Depends is a great text mode development utility made with Gui.cs

August 02, 2019 Comment on this post [10] Posted in DotNetCore | Open Source
Sponsored By

I love me some text mode. ASCII, ANSI, VT100. Keep your 3D accelerated ray traced graphics and give me a lovely emoji-based progress bar.

Miguel has a nice thing called Gui.cs and I bumped into it in an unexpected and lovely place. There are hundreds of great .NET Global Tools that you can install to make your development lifecycle smoother, and I was installing Martin Björkström's lovely "dotnet depends" tool (go give him a GitHub star now!)  like this:

dotnet tool install -g dotnet-depends

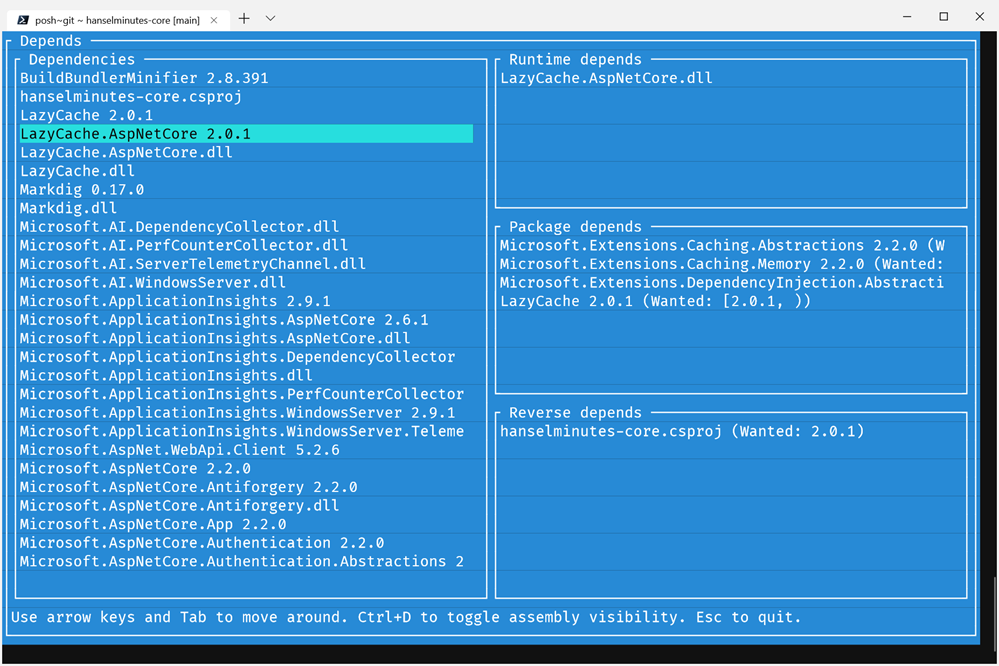
Then I headed over to my Windows Terminal (get it free in the Store) and ran "dotnet depends" on my main website's code and was greeted by this (don't sweat the line spacing, that's a Terminal bug that'll be fixed soon):

dotnet depends in the Windows Terminal

How nice is this! It's a fully featured dependency explorer but it's all in text mode and doesn't require me to use the mouse and take my hands of the keyboard. If I'm already deep into the terminal/text mode, this is a great example of a solid, useful tool.

But how hard was it to make? Surprisingly little as his code is very simple. This is a testament to how he used the API and how Miguel designed it. He's separated the UI and the Business Logic, of course. He does the analysis work and stores it in a graph variable.

Here they're setting up some panes for the (text mode) Windows:

Application.Init();

var top = new CustomWindow();

var left = new FrameView("Dependencies")
{
Width = Dim.Percent(50),
Height = Dim.Fill(1)
};
var right = new View()
{
X = Pos.Right(left),
Width = Dim.Fill(),
Height = Dim.Fill(1)
};

It's split in half at this point, with the left side staying  at 50%.

var orderedDependencyList = graph.Nodes.OrderBy(x => x.Id).ToImmutableList();
var dependenciesView = new ListView(orderedDependencyList)
{
CanFocus = true,
AllowsMarking = false
};
left.Add(dependenciesView);
var runtimeDependsView = new ListView(Array.Empty<Node>())
{
CanFocus = true,
AllowsMarking = false
};
runtimeDepends.Add(runtimeDependsView);
var packageDependsView = new ListView(Array.Empty<Node>())
{
CanFocus = true,
AllowsMarking = false
};
packageDepends.Add(packageDependsView);
var reverseDependsView = new ListView(Array.Empty<Node>())
{
CanFocus = true,
AllowsMarking = false
};
reverseDepends.Add(reverseDependsView);

right.Add(runtimeDepends, packageDepends, reverseDepends);
top.Add(left, right, helpText);
Application.Top.Add(top)

The right side gets three ListViews added to it and the left side gets the dependencies view. Top it off with some clean data binding to the views and an initial call to UpdateLists. Anytime the dependenciesView gets a SelectedChanged event we'll call UpdateLists again.

top.Dependencies = orderedDependencyList;
top.VisibleDependencies = orderedDependencyList;
top.DependenciesView = dependenciesView;

dependenciesView.SelectedItem = 0;
UpdateLists();

dependenciesView.SelectedChanged += UpdateLists;

Application.Run();

What's in update lists? Filtering code for that graph variable from before.

void UpdateLists()
{
var selectedNode = top.VisibleDependencies[dependenciesView.SelectedItem];

runtimeDependsView.SetSource(graph.Edges.Where(x => x.Start.Equals(selectedNode) && x.End is AssemblyReferenceNode)
.Select(x => x.End).ToImmutableList());
packageDependsView.SetSource(graph.Edges.Where(x => x.Start.Equals(selectedNode) && x.End is PackageReferenceNode)
.Select(x => $"{x.End}{(string.IsNullOrEmpty(x.Label) ? string.Empty : " (Wanted: " + x.Label + ")")}").ToImmutableList());
reverseDependsView.SetSource(graph.Edges.Where(x => x.End.Equals(selectedNode))
.Select(x => $"{x.Start}{(string.IsNullOrEmpty(x.Label) ? string.Empty : " (Wanted: " + x.Label + ")")}").ToImmutableList());
}

That's basically it and it's fast as heck. Probably to be expected from the folks that brought you Midnight Commander.

Are you working on any utilities or cool projects and might want to consider - gasp - text mode over a website?


Sponsor: Looking for a tool for performance profiling, unit test coverage, and continuous testing that works cross-platform on Windows, macOS, and Linux? Check out the latest JetBrains Rider!

About Scott

Scott Hanselman is a former professor, former Chief Architect in finance, now speaker, consultant, father, diabetic, and Microsoft employee. He is a failed stand-up comic, a cornrower, and a book author.

facebook bluesky subscribe
About   Newsletter
Hosting By
Hosted on Linux using .NET in an Azure App Service

Docker Desktop for WSL 2 integrates Windows 10 and Linux even closer

July 31, 2019 Comment on this post [13] Posted in Docker | Linux | Open Source
Sponsored By

Being able to seamlessly run Linux on Windows is making a bunch of common development tasks easier. When you're running WSL2 (Windows Subsystem for Linux 2) in a version of Windows 10 greater than build 18945, a BUNCH of useful and interesting scenarios light up and stuff just works.

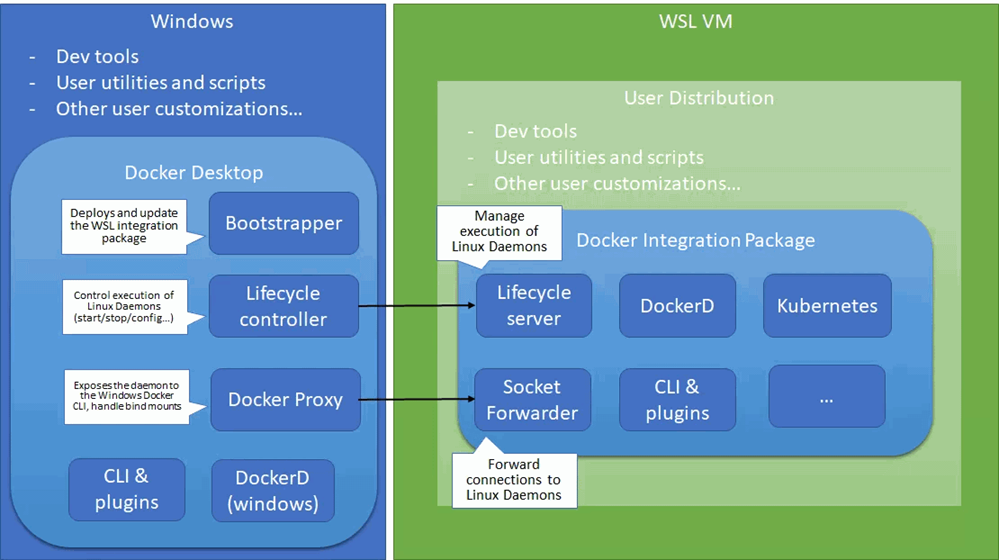
Docker for Windows (download the Docker Desktop for WSL 2 Tech preview here) is great, but it has historically worked on Windows by creating a Hyper-V virtual machine called Moby that is visible within the Hyper-V client. It's a utility VM, but it's one you're aware of.

Docker for Windows using WSL2

However, if WSL2 runs a real Linux kernel in Windows 10 and it's managing a virtual machine platform underneath (and not visible to) Hyper-V client tools, then why not just let WSL2 handle containers for us?

That's exactly what the Docker Desklop WSL 2 Tech Preview aims to do. And just like WSL 2, it's fast.

...the time required to start a Docker daemon after a cold start is significantly faster. It takes less than 2 seconds to start the Docker daemon when compared to tens of seconds in the current version of Docker Desktop.

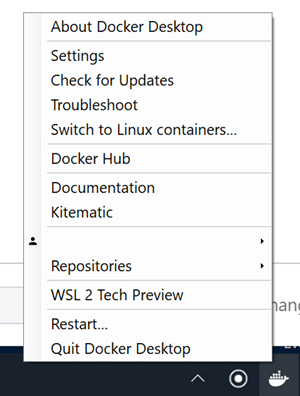
Once you've got a Linux (Ubuntu or the like) set up in WSL 2, you can right click on Docker Deskop and click "WSL 2 Tech Preview." This is a goofy and not-super-intuitive UI for now but it's a moment in time.

Click WSL 2 Tech Preview

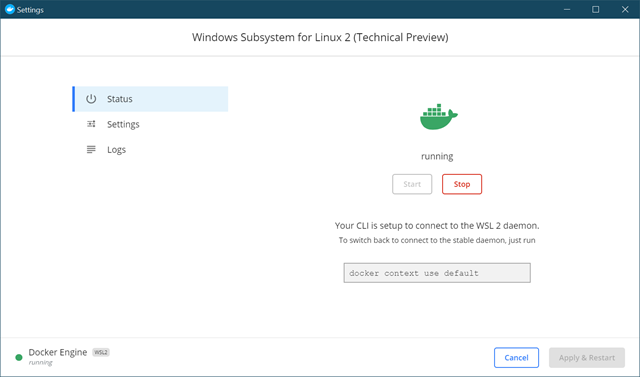
Then you just hit Start.

NOTE: If you've already installed Docker within WSL 2 at the command line, stop it and let Docker Desktop manage its lifecycle.

Here's the beginnings of their UI.

Docker for WSL2

When I drop out to PowerShell/CMD on Windows I can run "docker context ls."

C:\Users\Scott\Desktop> docker context ls    
NAME DESCRIPTION DOCKER ENDPOINT
default Current DOCKER_HOST based configuration npipe:////./pipe/docker_engine
wsl * Docker daemon hosted in WSL 2 npipe:////./pipe/docker_wsl

You can see there's two contexts, and I've run "docker context use wsl" and that's now my default.

Here is docker images from Ubuntu, and again from Windows (in PowerShell Core). They are the same!

Docker images in Ubuntu
Docker images from Powershell

Sweet. Here I am using PowerShell Core (which is open source and cross-platform, natch) to manage my builds which are themselves cross-platform and I can run both a docker build or a metal build on both Windows or Linux, all seamlessly on the same box.

building docker images

Also note, Simon from Docker points out "We are using a non default dataroot in this mode to avoid corrupting a datastore you use without docker desktop in case something goes wrong. Stopping the docker desktop wsl daemon and restarting the one you installed manually should bring everything back." I noticed this because my "Windows Docker" and my original WSL2 docker had a list of images that I naively expected to be available here, but this is a new context and new dataroot so you may need to fetch images again in this new world if you're have been historically an active docker user.

So far I'm super impressed. Linux on the Windows Desktop feels right. It's Peanut Butter and Chocolate.


Sponsor: Looking for a tool for performance profiling, unit test coverage, and continuous testing that works cross-platform on Windows, macOS, and Linux? Check out the latest JetBrains Rider!

About Scott

Scott Hanselman is a former professor, former Chief Architect in finance, now speaker, consultant, father, diabetic, and Microsoft employee. He is a failed stand-up comic, a cornrower, and a book author.

facebook bluesky subscribe
About   Newsletter
Hosting By
Hosted on Linux using .NET in an Azure App Service

Ruby on Rails on Windows is not just possible, it's fabulous using WSL2 and VS Code

July 26, 2019 Comment on this post [12] Posted in Linux | Open Source | Ruby | Win10
Sponsored By

I've been trying on and off to enjoy Ruby on Rails development on Windows for many years. I was doing Ruby on Windows as long as 13 years ago. There's been many valiant efforts to make Rails on Windows a good experience. However, given that Windows 10 can run Linux with WSL (Windows Subsystem for Linux) and now Windows runs Linux at near-native speeds with an actual shipping Linux Kernel using WSL2, Ruby on Rails folks using Windows should do their work in WSL2.

Running Ruby on Rails on Windows

Get a recent Windows 10

WSL2 will be released later this year but for now you can easily get it by signing up for Windows Insiders Fast and making sure your version of Windows is 18945 or greater. Just run "winver" to see your build number. Run Windows Update and get the latest.

Enable WSL2

You'll want the newest Windows Subsystem for Linux. From a PowerShell admin prompt run this:

Enable-WindowsOptionalFeature -Online -FeatureName Microsoft-Windows-Subsystem-Linux

and head over to the Windows Store and search for "Linux" or get Ubuntu 18.04 LTS directly. Download it, run it, make your sudo user.

Make sure your distro is running at max speed with WSL2. That earlier PowerShell prompt run wsl --list -v to see your distros and their WSL versions.

C:\Users\Scott\Desktop> wsl --list -v
NAME STATE VERSION
* Ubuntu-18.04 Running 2
Ubuntu Stopped 1
WLinux Stopped 1

You can upgrade any WSL1 distro like this, and once it's done, it's done.

wsl --set-version "Ubuntu-18.04" 2

And certainly feel free to get cool fonts and styles and make yourself a nice shiny Linux experience...maybe with the Windows Terminal.

Get the Windows Terminal

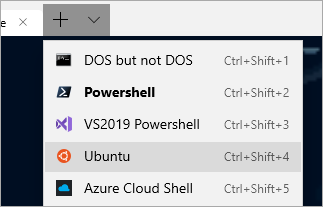
Bonus points, get the new open source Windows Terminal for a better experience at the command line. Install it AFTER you've set up Ubuntu or a Linux and it'll auto-populate its menu for you. Otherwise, edit your profiles.json and make a profile with a commandLine like this:

"commandline" : "wsl.exe -d Ubuntu-18.04"

See how I'm calling wsl -d (for distro) with the short name of the distro?

Ubuntu in the Terminal Menu

Since I have a real Ubuntu environment on Windows I can just follow these instructions to set up Rails!

Set up Ruby on Rails

Ubuntu instructions work because it is Ubuntu! https://gorails.com/setup/ubuntu/18.04

Additionally, I can install as as many Linuxes as I want, even a Dev vs. Prod environment if I like. WSL2 is much lighter weight than a full Virtual Machine.

Once Rails is set up, I'll try making a new hello world:

rails new myapp

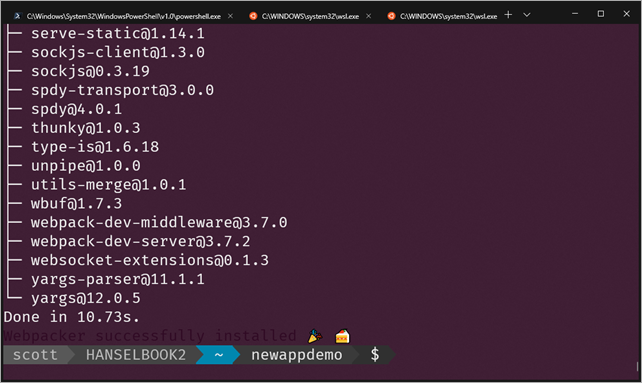
and here's the result!

Ruby on Rails in the new Windows Terminal

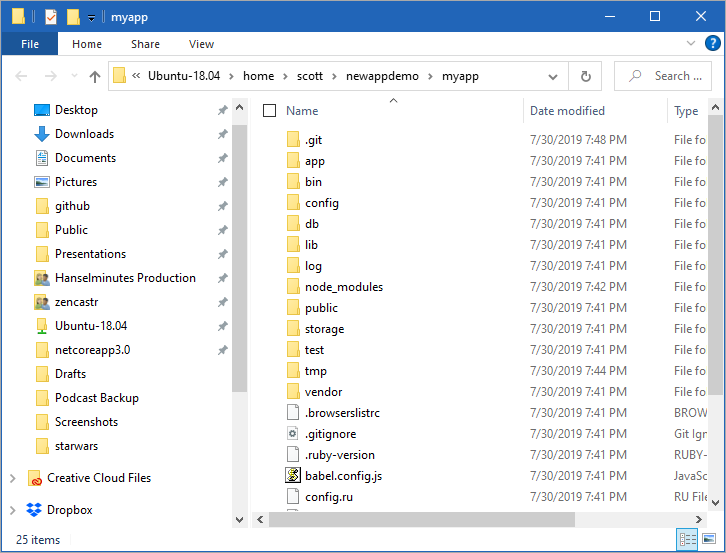
I can also run "explorer.exe ." and launch Windows Explorer and see and manage my Linux files. That's allowed now in WSL2 because it's running a Plan9 server for file access.

Ubuntu files inside Explorer on Windows 10

Install VS Code and the VS Code Remote Extension Pack

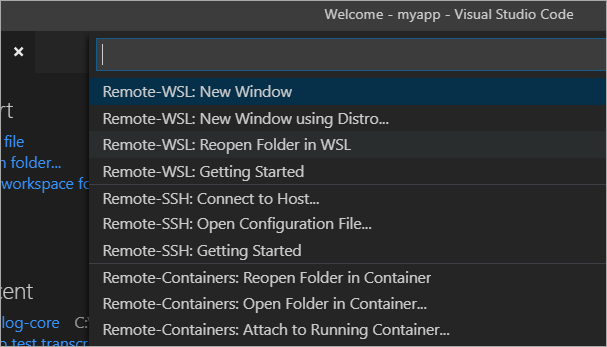
I'm going to install the VSCode Remote Extension pack so I can develop from Windows on remote machines OR in WSL or  Container directly. I can click the lower level corner of VS Code or check the Command Palette for this list of menu items. Here I can "Reopen Folder in WSL" and pick the distro I want to use.

Remote options in VS Code

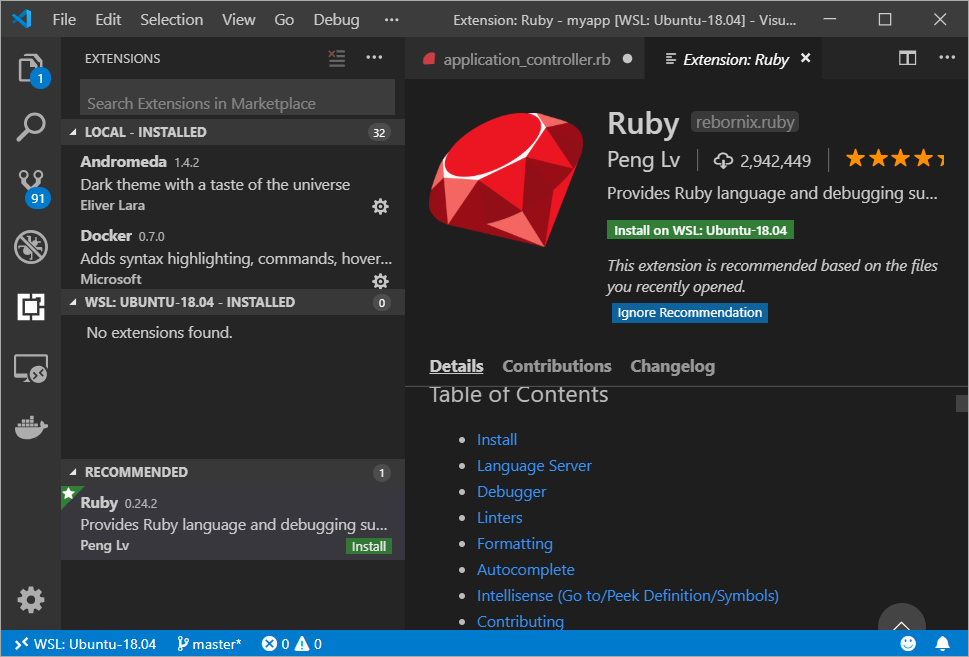
Now that I've opened the folder for development WSL look closely at the lower left corner. You can see I'm in a WSL development mode AND Visual Studio Code is recommending I install a Ruby VS Code extension...inside WSL! I don't even have Ruby and Rails on Windows. I'm going to have the Ruby language servers and VS Code headless parts live in WSL - in Linux - where they'll be the most useful.

Ruby inside WSL

This synergy, this balance between Windows (which I enjoy) and Linux (whose command line I enjoy) has turned out to be super productive. I'm able to do all the work I want - Go, Rust, Python, .NET, Ruby - and move smoothly between environments. There's not a clear separation like there is with the "run it in a VM" solution. I can access my Windows files from /mnt/c from within Linux, and I can always get to my Linux files at \\wsl$ from within Windows.

Note that I'm running rails server -b=0.0.0.0 to bind on all available IPs, and this makes Rails available to "localhost" so I can hit the Rails site from Windows! It's my machine, so it's my localhost (the networking complexities are handled by WSL2).

$ rails server -b=0.0.0.0
=> Booting Puma
=> Rails 6.0.0.rc2 application starting in development
=> Run `rails server --help` for more startup options
Puma starting in single mode...
* Version 3.12.1 (ruby 2.6.2-p47), codename: Llamas in Pajamas
* Min threads: 5, max threads: 5
* Environment: development
* Listening on tcp://0.0.0.0:3000
Use Ctrl-C to stop

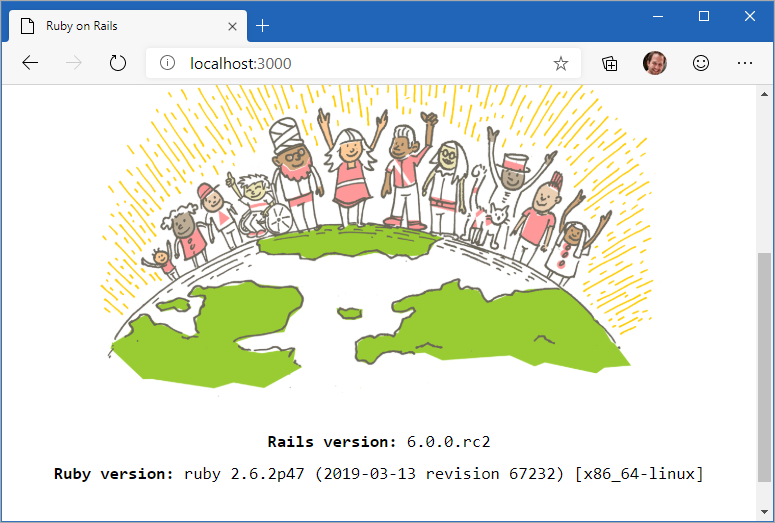
Here it is in new Edge (chromium). So this is Ruby on Rails running in WSL, as browsed to from Windows, using the new Edge with Chromium at its heart. Cats and dogs, living together, mass hysteria.

Ruby on Rails on Windows from WSL

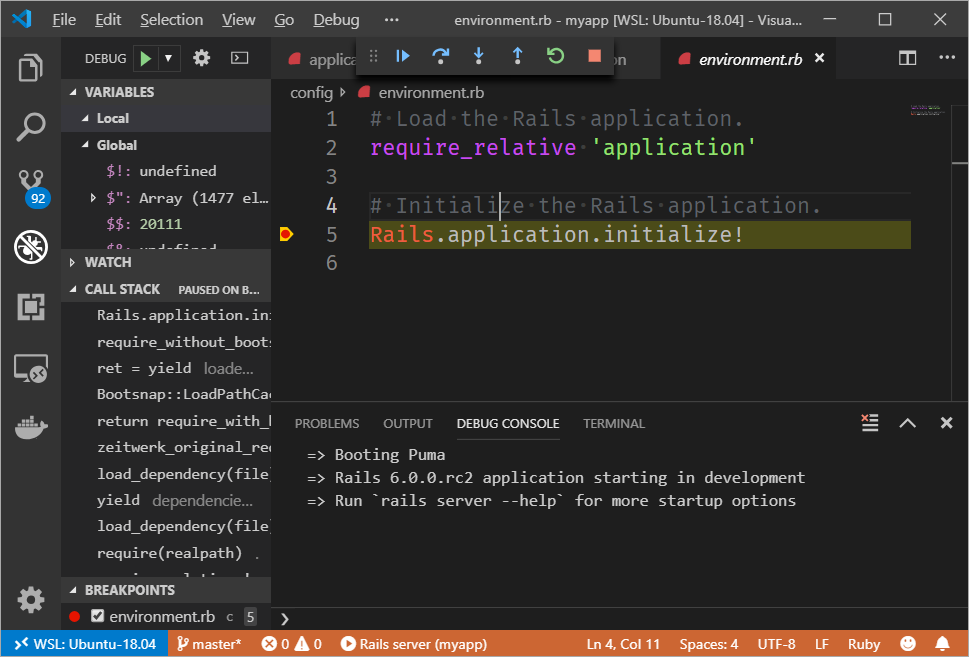
Even better, I can install the ruby-debug-ide gem inside WSL and now I'm doing interactive debugging from VS Code, but again, note that the "work" is happening inside WSL.

Debugging Rails on Windows

Enjoy!


Sponsor: Get the latest JetBrains Rider with WinForms designer, Edit & Continue, and an IL (Intermediate Language) viewer. Preliminary C# 8.0 support, rename refactoring for F#-defined symbols across your entire solution, and Custom Themes are all included.

About Scott

Scott Hanselman is a former professor, former Chief Architect in finance, now speaker, consultant, father, diabetic, and Microsoft employee. He is a failed stand-up comic, a cornrower, and a book author.

facebook bluesky subscribe
About   Newsletter
Hosting By
Hosted on Linux using .NET in an Azure App Service

System.Text.Json and new built-in JSON support in .NET Core

July 24, 2019 Comment on this post [10] Posted in ASP.NET | DotNetCore | Javascript
Sponsored By

In a world where JSON (JavaScript Object Notation) is everywhere it's long been somewhat frustrating that .NET didn't have built-in JSON support. JSON.NET is great and has served us well but it's remained a 3rd party dependency for basic stuff like an ASP.NET web site or a simple console app.

Back in 2018 plans were announced to move JSON into .NET Core 3.0 as an intrinsic supported feature, and while they're at it, get double the performance or more with Span<T> support and no memory allocations. ASP.NET in .NET Core 3.0 removes the JSON.NET dependency but still allows you to add it back in a single line if you'd like.

NOTE: This is all automatic and built in with .NET Core 3.0, but if you’re targeting .NET Standard or .NET Framework. Install the System.Text.Json NuGet package (make sure to include previews and install version 4.6.0-preview6.19303.8 or higher). In order to get the integration with ASP.NET Core, you must target .NET Core 3.0.

It's very clean as well. Here's a simple example.

using System;
using System.Text.Json;
using System.Text.Json.Serialization;

namespace verysmall
{
class WeatherForecast
{
public DateTimeOffset Date { get; set; }
public int TemperatureC { get; set; }
public string Summary { get; set; }
}

class Program
{
static void Main(string[] args)
{
var w = new WeatherForecast() { Date = DateTime.Now, TemperatureC = 30, Summary = "Hot" };
Console.WriteLine(JsonSerializer.Serialize<WeatherForecast>(w));
}
}
}

The default options result in minified JSON as well.

{"Date":"2019-07-27T00:58:17.9478427-07:00","TemperatureC":30,"Summary":"Hot"}      

Of course, when you're returning JSON from a Controller in ASP.NET it's all automatic and with .NET Core 3.0 it'll automatically use the new System.Text.Json unless you override it.

Here's an example where we pull out some fake Weather data (5 randomly created reports) and return the array.

[HttpGet]
public IEnumerable<WeatherForecast> Get()
{
var rng = new Random();
return Enumerable.Range(1, 5).Select(index => new WeatherForecast
{
Date = DateTime.Now.AddDays(index),
TemperatureC = rng.Next(-20, 55),
Summary = Summaries[rng.Next(Summaries.Length)]
})
.ToArray();
}

The application/json is used and JSON is returned by default. If the return type was just string, we'd get text/plain. Check out this YouTube video to learn more details about System.Text.Json works and how it was designed. I'm looking forward to working with it more!


Sponsor: Get the latest JetBrains Rider with WinForms designer, Edit & Continue, and an IL (Intermediate Language) viewer. Preliminary C# 8.0 support, rename refactoring for F#-defined symbols across your entire solution, and Custom Themes are all included.

About Scott

Scott Hanselman is a former professor, former Chief Architect in finance, now speaker, consultant, father, diabetic, and Microsoft employee. He is a failed stand-up comic, a cornrower, and a book author.

facebook bluesky subscribe
About   Newsletter
Hosting By
Hosted on Linux using .NET in an Azure App Service

Disclaimer: The opinions expressed herein are my own personal opinions and do not represent my employer's view in any way.