Scott Hanselman

NuGet's fancy older sibling FuGet gives you a whole new view of the .NET packaging ecosystem

January 25, 2019 Comment on this post [6] Posted in DotNetCore | NuGet
Sponsored By

FuGet diffsI remember when we announced NuGet (almost 10 years ago). Today you can get your NuGet packages (that contain .NET libraries) from Nuget.exe, from within Visual Studio, from the .NET CLI (command line interface), and from Paket. Choice is good!

Most folks are familiar with NuGet.org but have you used FuGet?

FuGet is "pro nuget package browsing!" Creating by the amazing Frank A. Krueger - of whom I am an immense fan - FuGet offers a different view on the NuGet package library. NuGet is a repository of nearly 150,000 open source libraries and the NuGet Gallery does a decent job of letting one browse around. However, https://github.com/praeclarum/FuGetGallery is an alternative web UI with a lot more depth.

FuGet is "advanced mode" for NuGet. It's a package browser combined with an API browser that helps you explore the XML documentation and metadata of a package's assemblies to help you explore and learn. And it's a JOY.

For example, if I look at https://www.fuget.org/packages/Newtonsoft.Json I can also see who depends on the package! https://www.fuget.org/packages/Newtonsoft.Json/dependents Who has taken a public dependency on your package? I can see supported frameworks, namepsaces, as well as internal types. For example, I can explore JToken within Newtonsoft.Json and its embedded docs!

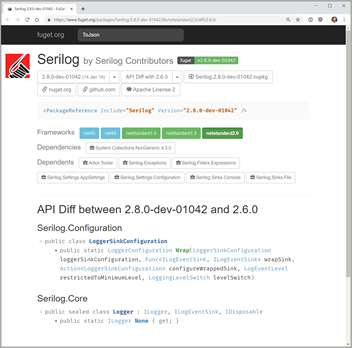
You can even do API diffs across versions! Check out https://www.fuget.org/packages/Serilog/2.8.0-dev-01042/lib/netstandard2.0/diff/2.6.0/ for example. This is an API Diff between 2.8.0-dev-01042 and 2.6.0 for Serilog. This could be useful for users or package maintainers when deciding how big a version bumb is required depending on how much of the API has changed. It also gives you a view (as the downstream consumer) of what's coming at you in pre-release versions!

From Frank's blog:

Have you ever wondered if the library your using has been customized for a certain platform? Have you wondered if it will work on your platform at all?

This doubt is removed by displaying - in full technicolor - all the frameworks that the library supports.

 Supported Frameworks

They’re color coded so you can see at a glance:

  • Green libraries are .NET Standard and will work everywhere
  • Dark blue libraries are platform specific
  • Light blue libraries are for full .NET and Mono only
  • Yellow libraries are old PCLs that we’re all trying to forget

FuGet.org is a fanstatic addition to the .NET ecosystem and I"d encourage you to bookmark it, use it, support it, and get involved!

If you're interesting in stuff like this (and the code that runs stuff like this) also check out Stephen Cleary's useful http://dotnetapis.com/ and it's associated code on GitHub https://github.com/StephenClearyApps/DotNetApis.


Sponsor: Your code is bad, but that’s ok thanks to Sentry’s full stack error monitoring that enables you to track and fix application errors in real time. Stop garbage code from becoming garbage fires.

About Scott

Scott Hanselman is a former professor, former Chief Architect in finance, now speaker, consultant, father, diabetic, and Microsoft employee. He is a failed stand-up comic, a cornrower, and a book author.

facebook bluesky subscribe
About   Newsletter
Hosting By
Hosted on Linux using .NET in an Azure App Service

How to use Windows 10's built-in OpenSSH to automatically SSH into a remote Linux machine

January 23, 2019 Comment on this post [6] Posted in DotNetCore | Hardware | Open Source
Sponsored By

In working on getting Remote debugging with VS Code on Windows to a Raspberry Pi using .NET Core on ARM in my last post, I was looking for optimizations and realized that I was using plink/putty for my SSH tunnel. Putty is one of those tools that we (as developers) often take for granted, but ideally I could do stuff like this without installing yet another tool. Being able to use out of the box tools has a lot of value.

A friend pointed out this part where I'm using plink.exe to ssh into the remote Linux machine to launch the VS Debugger:

"pipeTransport": {
"pipeCwd": "${workspaceFolder}",
"pipeProgram": "${env:ChocolateyInstall}\\bin\\PLINK.EXE",
"pipeArgs": [
"-pw",
"raspberry",
"root@crowpi.lan"
],
"debuggerPath": "/home/pi/vsdbg/vsdbg"
}

I could use Linux/bash that's built into Windows 10 for years now. As you may know, Windows 10 can run many Linuxes out of the box. If I have a Linux distro configured, I can call Linux commands locally from CMD or PowerShell. For example, here you see I have three Linuxes and one is the default. I can call "wsl" and any command line is passed in.

C:\Users\scott> wslconfig /l
Windows Subsystem for Linux Distributions:
Ubuntu-18.04 (Default)
WLinux
Debian
C:\Users\scott> wsl ls ~/
forablog forablog.2 forablog.2.save forablog.pub myopenaps notreal notreal.pub test.txt

So theoretically I could "wsl ssh" and use that Linux's ssh, but again, requires setup and it's a little silly. Windows 10 now supports OpenSSL already!

Open an admin PowerShell to see if you have it installed. Here I have the client software installed but not the server.

PS> Get-WindowsCapability -Online | ? Name -like 'OpenSSH*'

Name : OpenSSH.Client~~~~0.0.1.0
State : Installed

Name : OpenSSH.Server~~~~0.0.1.0
State : NotPresent

You can then add the client (or server) with this one-time command:

Add-WindowsCapability -Online -Name OpenSSH.Client~~~~0.0.1.0

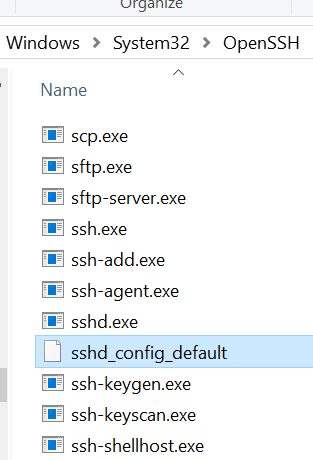
You'll get all the standard OpenSSH stuff that one would want.

OpenSSL tools on Windows

Let's say now that I want to be able to ssh (shoosh!) into a remote Linux machine using PGP keys rather than with a password. It's much more convenient and secure. I'll be ssh'ing with my Windows SSH into a remote Linux machine. You can see where ssh is installed:

C:\Users\scott>where ssh
C:\Windows\System32\OpenSSH\ssh.exe

Level set - What are we doing and what are we trying to accomplish?

I want to be able to type "ssh pi@crowpi" from my Windows machine and automatically be logged in.

I will

  • Make a key on my Window machine. The FROM. I want to ssh FROM here TO the Linux machine.
  • Tell the Linux machine (by transferring it over) about the public piece of my key and add it to a specific user's allowed_keys.
  • PROFIT

Here's what I did. Note you can do this is several ways. You can gen the key on the Linux side and scp it over, you can use a custom key and give it a filename, you can use a password as you like. Just get the essence right.

Below, note that when the command line is C:\ I'm on Windows and when it's $ I'm on the remote Linux machine/Raspberry Pi.

  • gen the key on Windows with ssh-keygen
  • I ssh'ed over to Linux and note I'm prompted for a password, as expected.
  • I "ls" to see that I have a .ssh/ folder. Cool. You can see authorized_keys is in there, you may or may no have this file or folder. Make the ~/.ssh folder if you don't.
  • Exit out. I'm in Windows now.
  • Look closely here. I'm "scott" on Windows so my public key is in c:\users\scott\.ssh\id_rsa.pub. Yours could be in a file you named earlier, be conscious.
    • I'm type'ing (cat on Linux is type on Windows) that text file out and piping it into SSH where I login that remote machine with the user pi and I then cat (on the Linux side now) and append >> that text to the .ssh/authorized_keys folder. The ~ folder is implied but could be added if you like.
  • Now when I ssh pi@crowpi I should NOT be prompted for a password.

Here's the whole thing.

C:\Users\scott\Desktop> ssh-keygen
Generating public/private rsa key pair.
Enter file in which to save the key (C:\Users\scott/.ssh/id_rsa):
Enter passphrase (empty for no passphrase):
Enter same passphrase again:
Your identification has been saved in C:\Users\scott/.ssh/id_rsa.
Your public key has been saved in C:\Users\scott/.ssh/id_rsa.pub.
The key fingerprint is:
SHA256:x2vJHHXwosSSzLHQWziyx4II+scott@IRONHEART
The key's randomart image is:
+---[RSA 2048]----+
| . .... . |
|..+. .=+=. o |
| .. |
+----[SHA256]-----+
C:\Users\scott\Desktop> ssh pi@crowpi
pi@crowpi's password:
Linux crowpi 2018 armv7l

pi@crowpi:~ $ ls .ssh/
authorized_keys id_rsa id_rsa.pub known_hosts
pi@crowpi:~ $ exit
logout
Connection to crowpi closed.
C:\Users\scott\Desktop> type C:\Users\scott\.ssh\id_rsa.pub | ssh pi@crowpi 'cat >> .ssh/authorized_keys'
pi@crowpi's password:
C:\Users\scott\Desktop> ssh pi@crowpi
pi@crowpi: ~ $

Fab. At this point I could go BACK to my Windows' Visual Studio Code launch.json and simplify it to NOT use Plink/Putty and just use ssh and the ssh key management that's included with Windows.

"pipeTransport": {
"pipeCwd": "${workspaceFolder}",
"pipeProgram": "ssh",
"pipeArgs": [
"pi@crowpi.lan"
],
"debuggerPath": "/home/pi/vsdbg/vsdbg"
}

Cool!

NOTE: In my previous blog post some folks noted I am logging in as "root." That's an artifact of the way that .NET Core is accessing the GPIO pins. That won't be like that forever.

Thoughts? I hope this helps someone.


Sponsor: Your code is bad, but that’s ok thanks to Sentry’s full stack error monitoring that enables you to track and fix application errors in real time. Stop garbage code from becoming garbage fires.

About Scott

Scott Hanselman is a former professor, former Chief Architect in finance, now speaker, consultant, father, diabetic, and Microsoft employee. He is a failed stand-up comic, a cornrower, and a book author.

facebook bluesky subscribe
About   Newsletter
Hosting By
Hosted on Linux using .NET in an Azure App Service

Remote debugging with VS Code on Windows to a Raspberry Pi using .NET Core on ARM

January 18, 2019 Comment on this post [8] Posted in DotNetCore | Hardware | Open Source
Sponsored By

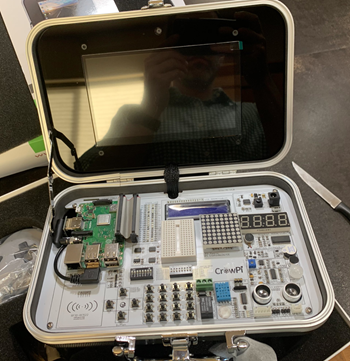
I've been playing with my new "CrowPi" from Elecrow. It's a great Raspberrry Pi STEM kit that is entirely self-contained in a small case. It includes a touch screen and a TON of sensors, LCDs, matrix display, sensors, buzzers, breadboard, etc.

NOTE: I talked to the #CrowPi people and they gave me an Amazon COUPON that's ~$70 off! The coupon is 8EMCVI56 and will work until Jan 31, add it during checkout. The Advanced Kit is at https://amzn.to/2SVtXl2 #ref and includes everything, touchscreen, keyboard, mouse, power, SNES controllers, motors, etc. I will be doing a full review soon. Short review is, it's amazing.

I was checking out daily builds of the new open source .NET Core System.Device.Gpio that lets me use C# to talk to the General Purpose Input/Output pins (GPIO) on the Raspberry Pi. However, my "developer's inner loop" was somewhat manual. The developer's inner loop is that "write code, run code, change code" loop that we all do. If you find yourself typing repetitive commands that deploy or test your code but don't write new code, you'll want to try to optimize that inner loop and get it down to one keystroke (or zero in the case of automatic test).

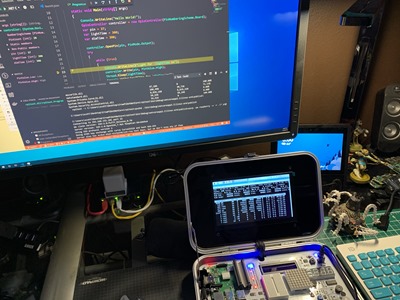
Rasbperry Pi Debugging with VS CodeIn my example, I was writing my code in Visual Studio Code on my Windows machine, building the code locally, then running a "publish.bat" that would scp (secure copy) the resulting binaries over to the Raspberry Pi. Then in another command prompt that was ssh'ed into the Pi, I would chmod the resulting binary and run it. This was tedious and annoying, however as programmers sometimes we stop noticing it and just put up with the repetitive motion.

A good (kind of a joke, but not really) programmer rule of thumb is - if you do something twice, automate it.

I wanted to be able not only to make the deployment automatic, but also ideally I'd be able to interactively debug my C#/.NET Core code remotely. That means I'm writing C# in Visual Studio Code on my Windows machine, I hit "F5" to start a debug session and my app is compiled, published, run, and I attached to a remote debugger running on the Raspberry Pi, AND I'm dropped into a debugging session with a breakpoint set. All with one keystroke. This is common practice with local apps, but for remote apps - and ones that span two CPU architectures - it can take a smidge of setup.

Starting with instructions here: https://github.com/OmniSharp/omnisharp-vscode/wiki/Attaching-to-remote-processes and here: https://github.com/OmniSharp/omnisharp-vscode/wiki/Remote-Debugging-On-Linux-Arm and a little help from Jose Perez Rodriguez at work, here's what I came up with.

Setting up Remote Debugging from Visual Code on Windows to a Raspberry Pi running C# and .NET Core

First, I'm assuming you've got .NET Core on both your Windows machine and Raspberry Pi. You've also installed Visual Studio Code on you Windows machine and you've installed the C# extension.

On the Raspberry Pi

I'm ssh'ing into my Pi from Windows 10. Windows 10 includes ssh out of the box now, but you can also ssh from WSL (Windows Subsystem for Linux).

  1. Install the VS remote debugger on your Pi by running this command:
    curl -sSL https://aka.ms/getvsdbgsh | /bin/sh /dev/stdin -v latest -l ~/vsdbg
  2. ​To debug you will need to run the program as root, so we'll need to be able to remote launch the program as root as well. For this, we need to first set a password for the root user in your pi, which you can do by running:
    sudo passwd root
  3. Then we need to enable ssh connections using root, by running :
    sudo nano /etc/ssh/sshd_config        
    and adding a line that reads:
    PermitRootLogin yes
  4. reboot the pi: sudo reboot

VSDbg looks like this getting installed:

pi@crowpi:~/Desktop/rpitest$ curl -sSL https://aka.ms/getvsdbgsh | /bin/sh /dev/stdin -v latest -l ~/vsdbg
Info: Creating install directory
Using arguments
Version : 'latest'
Location : '/home/pi/vsdbg'
SkipDownloads : 'false'
LaunchVsDbgAfter : 'false'
RemoveExistingOnUpgrade : 'false'
Info: Using vsdbg version '16.0.11220.2'
Info: Previous installation at '/home/pi/vsdbg' not found
Info: Using Runtime ID 'linux-arm'
Downloading https://vsdebugger.azureedge.net/vsdbg-16-0-11220-2/vsdbg-linux-arm.zip
Info: Successfully installed vsdbg at '/home/pi/vsdbg'

At this point I've got vsdbg installed. You can go read about the MI Debug Engine here. "The Visual Studio MI Debug Engine ("MIEngine") provides an open-source Visual Studio Debugger extension that works with MI-enabled debuggers such as gdb, lldb, and clrdbg."

On the Windows Machine

Note that there are a half dozen ways to do this. Since I had a publish.bat already that looked like this, after installing putty with "choco install putty" on my Windows machine. I'm a big fan of pushd and popd and I'll tell you this, they aren't used or known enough.

dotnet publish -r linux-arm /p:ShowLinkerSizeComparison=true 
pushd .\bin\Debug\netcoreapp2.1\linux-arm\publish
pscp -pw raspberry -v -r .\* pi@crowpi.lan:/home/pi/Desktop/rpitest
popd

On Windows, I want to add two things to my .vscode folder. I'll need a launch.json that has my "Launch target" and I'll need some tasks in my tasks.json to support that. I added the "publish" task myself. My publish task calls out to publish.bat. It could also do the stuff above if I wanted. Note that I made publish "dependsOn" build, and I removed/cleared problemMatcher. If you wanted, you could write a regEx that would detect if the publish failed.

{
"version": "2.0.0",
"tasks": [
{
"label": "build",
"command": "dotnet",
"type": "process",
"args": [
"build",
"${workspaceFolder}/rpitest.csproj"
],
"problemMatcher": "$msCompile"
},
{
"label": "publish",
"type": "shell",
"dependsOn": "build",
"presentation": {
"reveal": "always",
"panel": "new"
},
"options": {
"cwd": "${workspaceFolder}"
},
"windows": {
"command": "${cwd}\\publish.bat"
},
"problemMatcher": []
}
]
}

Then in my launch.json, I have this to launch the remote console. This can be a little confusing because it's mixing paths that are local to Windows with paths that are local to the Raspberry Pi. For example, pipeProgram is using the Chocolatey installation of Putty's Plink. But program and args and cwd are all remote (or local to) the Raspberry Pi.

"configurations": [
{
"name": ".NET Core Launch (remote console)",
"type": "coreclr",
"request": "launch",
"preLaunchTask": "build",
"program": "/home/pi/dotnet/dotnet",
"args": ["/home/pi/Desktop/rpitest/rpitest.dll"],
"cwd": "/home/pi/Desktop/rpitest",
"stopAtEntry": false,
"console": "internalConsole",
"pipeTransport": {
"pipeCwd": "${workspaceFolder}",
"pipeProgram": "${env:ChocolateyInstall}\\bin\\PLINK.EXE",
"pipeArgs": [
"-pw",
"raspberry",
"root@crowpi.lan"
],
"debuggerPath": "/home/pi/vsdbg/vsdbg"
}
}

Note the debugger path lines up with the location above that we installed vsdbg.

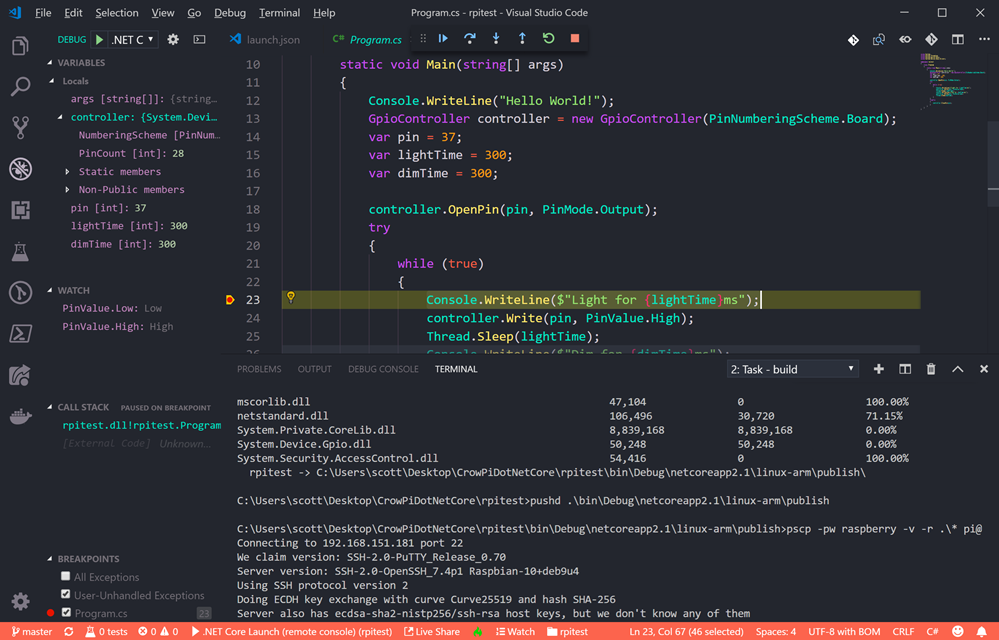
Remote debugging with VS Code on Windows to a Raspberry Pi using .NET Core

It's worth pointing out that while I'm doing this for C# it's not C# specific. You could setup remote debugging with VS Code using these building blocks with any environment.

The result here is that my developer's inner loop is now just pressing F5! What improvements would YOU make?


Sponsor: Preview the latest JetBrains Rider with its Assembly Explorer, Git Submodules, SQL language injections, integrated performance profiler and more advanced Unity support.

About Scott

Scott Hanselman is a former professor, former Chief Architect in finance, now speaker, consultant, father, diabetic, and Microsoft employee. He is a failed stand-up comic, a cornrower, and a book author.

facebook bluesky subscribe
About   Newsletter
Hosting By
Hosted on Linux using .NET in an Azure App Service

Installing the .NET Core 2.x SDK on a Raspberry Pi and Blinking an LED with System.Device.Gpio

January 16, 2019 Comment on this post [10] Posted in DotNetCore | Hardware | Open Source
Sponsored By

The CrowPi from Elecrow is an amazing STEM KitI've written about running .NET Core on Raspberry Pis before, although support was initially limited. Now that Linux ARM32 is a supported distro, what else can we do?

We can certainly quickly and easily install Docker on a Raspberry Pi and be running C# and .NET Core programs in minutes. We can run .NET Core in a stack of Raspberry Pis as a Kubernetes Cluster, making our own tiny cloud and install a serverless platform in it like OpenFaas!

If you have a Raspberry Pi 3 with Raspbian on it like I do, check out https://dotnet.microsoft.com/download/dotnet-core/2.2 and note that last part of the URL. You can ask for /2.1, /2.0, etc, just in case you're reading this post in the future, like tomorrow. ;) Everything is always at https://dotnet.microsoft.com/download/archives so you can tell what's Current and what's not.

For example, if I end up here https://dotnet.microsoft.com/download/thank-you/dotnet-sdk-2.2.102-linux-arm32-binaries I can grab the exact blob URL from the "try again" link and then wget it on my Raspberry Pi. You'll want to get a few prerequisites first. Note these blob links change when new stuff comes out, so you'll want to double check to get latest.

sudo apt-get install curl libunwind8 gettext
wget https://download.visualstudio.microsoft.com/download/pr/9650e3a6-0399-4330-a363-1add761127f9/14d80726c16d0e3d36db2ee5c11928e4/dotnet-sdk-2.2.102-linux-arm.tar.gz
wget https://download.visualstudio.microsoft.com/download/pr/9d049226-1f28-4d3d-a4ff-314e56b223c5/f67ab05a3d70b2bff46ff25e2b3acd2a/aspnetcore-runtime-2.2.1-linux-arm.tar.gz

I got the Linux ARM 32-bit SDK as well as the ASP.NET Runtime so I have those packages available for any web apps I choose to make.

Then we'll extract. You can set it up as a user off of $HOME or in /opt/dotnet and then link to /usr/local/bin.

mkdir -p $HOME/dotnet && tar zxf dotnet-sdk-2.2.102-linux-arm.tar.gz -C $HOME/dotnet
export DOTNET_ROOT=$HOME/dotnet
export PATH=$PATH:$HOME/dotnet

Don't forget to untar the ASP.NET Runtime as well.

tar zxf aspnetcore-runtime-2.2.1-linux-arm.tar.gz -C $HOME/dotnet

Cool. You will want to add the PATH to your profile if you want it to survive restarts. Then run "dotnet --info" to see if it works.

pi@crowpi:~ $ dotnet --info
.NET Core SDK (reflecting any global.json):
Version: 2.2.102

Runtime Environment:
OS Name: raspbian
OS Version: 9
OS Platform: Linux
RID: linux-arm
Base Path: /home/pi/dotnet/sdk/2.2.102/

Host (useful for support):
Version: 2.2.1

.NET Core SDKs installed:
2.2.102 [/home/pi/dotnet/sdk]

.NET Core runtimes installed:
Microsoft.AspNetCore.All 2.2.1 [/home/pi/dotnet/shared/Microsoft.AspNetCore.All]
Microsoft.AspNetCore.App 2.2.1 [/home/pi/dotnet/shared/Microsoft.AspNetCore.App]
Microsoft.NETCore.App 2.2.1 [/home/pi/dotnet/shared/Microsoft.NETCore.App]

Looks good.

At this point I have BOTH the .NET Core runtime (for running stuff) as well as all the ASP.NET runtime for web apps or little microservices AND the .NET SDK which means I can actually compile code (slowly) on the Pi itself. It's up to me/you. If you aren't ever going to develop (compile code) on the Raspberry Pi, you can just install the runtime, but I think it's nice to be prepared.

I am installing all this on a wonderful Raspberry Pi kit called a "CrowPi." They had a successful KickStarter and are now selling a Raspberry Pi Educational Kit with an attached custom board with dozens of components. Rather than having to connect motion sensors, sound sensors, touch sensors, switches, buttons, and carry around a bunch of wires, you can experiment and play with stuff in a very organized case that also has a 7inch HDMI touch screen. They also have 21 great Python Video Courses on their YouTube Channel on how to get started with hardware. It's a joy of a device. More on that later.

NOTE: I talked to the #CrowPi people and they gave me an Amazon COUPON that's ~$70 off! The coupon is 8EMCVI56 and will work until Jan 31, add it during checkout. The Advanced Kit is at https://amzn.to/2SVtXl2 #ref and includes everything, touchscreen, keyboard, mouse, power, SNES controllers, motors, etc. I will be doing a full review soon. Short review is, it's amazing.

Now that .NET Core is installed, I can start exploring the fun happening over at https://github.com/dotnet/iot. It's filled with lots of new functionality inside of System.Device.Gpio. Remember that GPIO means "General Purpose Input/Output" which, on a Raspberry Pi, is connected to a ribbon cable on the CrowPi with lots of cool sensors ready to go!

I could build my Raspberry Pi apps on my Windows/Mac/Linux machine and I'll find it much faster to compile. Then I can "scp" (secure copy) it over to the Pi. It's nice to point out that Windows 10 includes scp.exe now by default!

In this example, by adding -r linux-arm I'm copying a complete self-contained app over the Pi, so don't actually need to install .NET Core like I did above. If instead, I didn't use -r (to declare a specific runtime) then I would need to make sure I've got the right versions on my dev box vs my RPi, so consider what's best for you.

Here I am in my Windows machine that also has the same version of the .NET Core SDK installed. I'm in .\rpitest with a console app I made with "dotnet new console." Now I want to build and copy it over to the Pi.

dotnet publish -r linux-arm
cd bin\Debug\netcore2.1\linux-arm\publish
scp -r . pi@crowpi:/home/pi/Desktop/rpitest

From the Pi, I'll need to "sudo chmod +x" the rpitest application to make sure it is executable.

There's a brilliant video from Cam Soper that shows you in great detail how to run .NET Core 2.x on a Raspberry Pi and I recommend you check it out as well.

IoT devices expose much more than serial ports. They typically expose multiple kinds of pins that can be programmatically used to read sensors, drive LED/LCD/eInk displays and communicate with our devices. .NET Core now has APIs for GPIO, PWM, SPI, and I²C pin types.

These APIs are available via the System.Device.GPIO NuGet package. It will be supported for .NET Core 2.1 and later releases. There's some basic samples here https://github.com/dotnet/iot/blob/master/samples/README.md to start with.

From Microsoft:

Most of our effort has been spent on supporting these APIs in Raspberry Pi 3. We plan to support other devices, like the Hummingboard. Please tell us which boards are important to you. We are in the process of testing Mono on the Raspberry Pi Zero.

For now System.Device.Gpio is a prelease so you'll want to add a nuget.config to your project with the path to the dailies:

<?xml version="1.0" encoding="utf-8"?>
<configuration>
<packageSources>
<clear />
<add key="myget.org" value="https://dotnet.myget.org/F/dotnet-core/api/v3/index.json" />
<add key="nuget.org" value="https://api.nuget.org/v3/index.json" />
</packageSources>
</configuration>

Add a reference to System.Device.Gpio or (at the time of this writing) version 0.1.0-prerelease.19065.1. Now let's do something!

Here I'm just blinking this LED!

Console.WriteLine("Hello World!");
GpioController controller = new GpioController(PinNumberingScheme.Board);
var pin = 37;
var lightTime = 300;

controller.OpenPin(pin, PinMode.Output);
try {
while (true) {
controller.Write(pin, PinValue.High);
Thread.Sleep(lightTime);
controller.Write(pin, PinValue.Low);
Thread.Sleep(lightTime);
}
}
finally {
controller.ClosePin(pin);
}

Yay! Step zero works! Every cool IoT projects starts with a blinking LED!
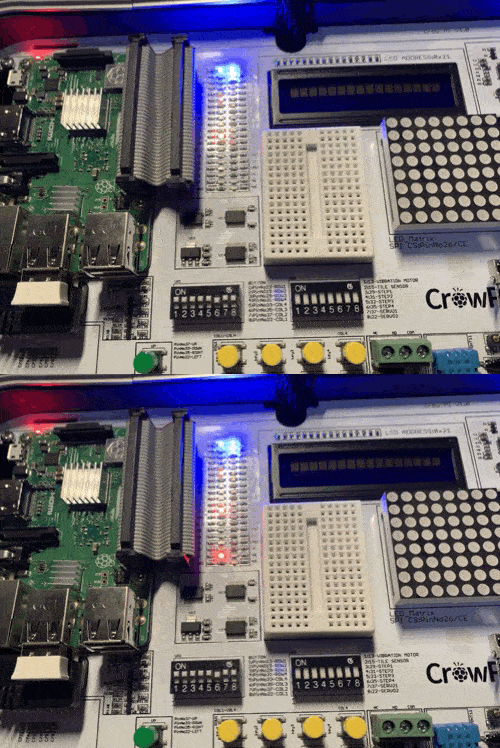
Blinking LEDs ZOMG

Do be aware that System.Device.Gpio is moving VERY fast and some of this code and the samples may not work if namespaces or class names change. It'll settle down soon.

Great stuff though! Go get involved over at https://github.com/dotnet/iot as they are actively working on drivers/abstractions for Windows, Linux, etc and you could even submit a PR for a device like an LCD or simple sensor! I've only been playing for an hour but I will report back as I try new experiments with my kids.


Sponsor: Preview the latest JetBrains Rider with its Assembly Explorer, Git Submodules, SQL language injections, integrated performance profiler and more advanced Unity support.

About Scott

Scott Hanselman is a former professor, former Chief Architect in finance, now speaker, consultant, father, diabetic, and Microsoft employee. He is a failed stand-up comic, a cornrower, and a book author.

facebook bluesky subscribe
About   Newsletter
Hosting By
Hosted on Linux using .NET in an Azure App Service

How to update the firmware on your Zune, without Microsoft, dammit.

January 11, 2019 Comment on this post [11] Posted in Tools
Sponsored By

A glorious little ZuneAs I said on social media today, it's 2019 and I'm updating the Firmware on a Zune, fight me. ;) There's even an article on Vice about the Zune diehards. The Zune is a deeply under-respected piece of history and its UI marked the start of Microsoft's fluent design.

Seriously, though, I got this Zune and it's going to be used by my 11 year old because I don't want him to have a phone yet. He's got a little cheap no-name brand MP3 player and he's filled it up and basically outgrown it. I could get him an iPod Touch or something but he digs retro things (GBC, GBA, etc) so my buddy gave me a Zune in the box. Hasn't been touched...but it has a super old non-metro UI firmware.

Can a Zune be updated in 2019? Surely it can. Isn't Zune dead? I hooked up a 3D0 to my 4k flatscreen last week, so it's dead when I say it's dead.

IMPORTANT UPDATE: After I spent time doing this out I found out on Twitter that there's a small but active Zune community on Reddit! Props for them to doing this in several ways as well. The simplest way to update today is to point resources.zune.net to zuneupdate.com's IP address in your hosts file. The way I did it does use the files directly from Microsoft and gives you full control, but it's overly complex for regular folks for as long as the zuneupdate.com server exists as a mirror. Use the method that works easier for you and that you trust and understand!

  • First, GET ZUNE: the Zune Software version 4.8 is up at the Microsoft Download Center and it installs just fun on Windows 10. I've also made a copy in my Dropbox if this ever disappears. You should too!
  • Second, GET FIRMWARE: the Zune Firmware is still on the Microsoft sites as well. This is an x86 MSI so don't bother trying to install it, we're going to open it up like an archive instead. Save this file forever.
    • There's a half dozen ways to crack open an MSI. Since not everyone who will read this blog is a programmer, the easiest ways is
    • Download lessmsi and use it to to the open and extract the firmware MSI. It's just an MSI specific extractor but it's nicer than 7zip because it extracts the files with the correct names. If you use Chocolatey, it's just "choco install lessmsi" then run "lessmsi-gui." LessMSI will put the files in a deep folder structure. You'll want to move them and have all your files right at the top of c:\users\YOURNAME\downloads\zunestuff. We will make some other small changes a little later on here.
      LessMSI
    • If you really want to, you could install 7zip and extract the contents of the Zune Firmware MSI into a new folder but I don't recommend it as you'll need to rename the files and give them the correct extensions.
    • NERDS: you can also use msiexec from the command line, but I'm trying to keep this super simple.
  • Third, FAKE THE ZUNE UPDATE SERVER: Since the Zune servers are gone, you need to pretend to be the old Zune Server. The Zune Software will "phone home" to Microsoft at resources.zune.net (which is gone) to look for firmware. Since the Zune software was made in a simpler time (a decade ago) it doesn't use SSL or do any checking for the cert to confirm the identity of the Zune server. This would be sad in 2019, but it's super useful to us when bringing this old hardware back to life. Again, there's as half dozen ways to do this. Feel feel to do whatever makes you happy as an HTTP GET is an HTTP GET, isn't it?
    • NERDS: If you use Fiddler or any HTTP sniffer you can launch the Zune software and see it phone home for resources.zune.net/firmware/v4_5/zuneprod.xml and get a 404. It if had found this, it'd look at your Zune model and then figure out which cab (cabinet) archive to get the firmware from. We can easily spoof this HTTP GET.
    • NERDS^2: Why didn't I use the Fiddler Autoresponder to record and replay the HTTP GETS? I tried. However, there's a number of different files that the Zune software could request and I only have the one Zune and I couldn't figure out how to model it in Fiddler. If I could do this, we could just install Fidder and avoid editing the hosts file AND using a tiny web server.
    • From an admin command prompt, run notepad \windows\system32\drivers\etc\hosts and add this line:
      127.0.0.1 resources.zune.net
    • This says "if you ever want stuff from resources.zune.net, I'll handle it myself." Who is "myself?" It's our computer! It'll be a little web server you (or I) will run on our own, on localhost AKA 127.0.0.1.
    • Now download dot.net core, it's small and fast to install programming environment. Don't worry, we aren't coding, we are just using the tools it includes. It won't mess up your machine or install anything at startup.
    • Grab any 2.x .NET SDK from https://dot.net and install it from an MSI. Then go to a command prompt and run these commands. first we'll run dotnet once to warm it up, then get the server and run it from our zunestuff folder. We'll install a tiny static webserver called dotnet serve. See below:
      dotnet
      dotnet tool install --global dotnet-serve
      cd c:\users\YOURNAME\downloads\zunestuff
      dotnet serve -p 80
    • If you get any errors that dotnet serve can't be found, just close the command prompt and open it again to update your PATH. If you get errors that port 80 is open, be sure to stop IIS or Skype Desktop or anything that might be listening on port 80.
    • Now, remember where I said you'd extract all those cabs and files out of the Firmware MSI? BUT when we load the Zune software and watch network traffic, we see it's asking for resources.zune.net/firmware/v4_5/zuneprod.xml. We need to answer (since Zune is gone, it's on us now)
    • You'll want to make folders like this: C:\users\YOURNAME\downloads\zunestuff\firmware\v4_5 copy/rename copy FirmwareUpdate.xml to zuneprod.xml and have it live in that directory. It'll look like this:
      A file heirarchy under zunestuff
    • The zuneprod.xml file has relative URls inside like this, one for each model of the Zune that maps from USB hardware id to cab file. Open zuneprod.xml in a text editor and add http://resources.zune.net/ before each of the firmware file cabinets. For example if you're using notepad, your find and replace will look like this.
      Replace URL=" with URL="http://resources.zune.net/
    • <FirmwareUpdate DeviceClass="1"
      FamilyID="3"
      HardwareID="USB\Vid_045e&amp;Pid_0710&amp;Rev_0300"
      Manufacturer="Microsoft"
      Name="Zune"
      Version="03.30.00039.00-01620"
      URL="DracoBaseline.cab">

    • UPDATE: As mentioned above, I did all this work (about an hour of traffic sniffing) and spoofed the server locally then found out that someone made http://zuneupdate.com as an online static spoof! It also doesn't use HTTPS, and if you'd like, you can skip the local spoof and point your your \windows\system32\drivers\etc\hosts with an entry pointing resources.zune.net to its IP address - which at the time of this writing was 66.115.133.19. Your hosts file would look like this, in that case. If this useful resource ever goes away, use the localhost hack above.
      66.115.133.19 resources.zune.net
    • Now run the Zune software, connect your Zune. Notice here that I know it's working because I launch the Zune app and go to Settings | Device then Update and I can see dotnet serve in my other window serving the zuneprod.xml in response.

Required Update

It's worth pointing out that the original Zune server was somewhat smart and would only return firmware if we NEEDED a firmware update. Since we are faking it, we always return the same response. You may be prompted to install new firmware if you manually ask for an update. But you only need to get on the latest (3.30 for my brown Zune 30) and then you're good...forever.

image

Enjoy!

Your iPod SucksZune is the way

Guardians 2 Zune


Sponsor: Preview the latest JetBrains Rider with its Assembly Explorer, Git Submodules, SQL language injections, integrated performance profiler and more advanced Unity support.

About Scott

Scott Hanselman is a former professor, former Chief Architect in finance, now speaker, consultant, father, diabetic, and Microsoft employee. He is a failed stand-up comic, a cornrower, and a book author.

facebook bluesky subscribe
About   Newsletter
Hosting By
Hosted on Linux using .NET in an Azure App Service

Disclaimer: The opinions expressed herein are my own personal opinions and do not represent my employer's view in any way.